
Build and Ship Astro Sites with Deno and Deno Deploy

Astro is a web framework designed for content-centric websites. Its API design and tooling make it easy to progressively build more complex websites, but send zero JavaScript to the client by default. Like chicken and waffles, Deno and Astro have worked well together for some time. But with the recent 1.35 release of the Deno runtime, the experience of using Astro with Deno has gotten even better.
Today, we’ll cover all the ways you can use Astro and Deno together, and then run your apps in production using Deno Deploy. If you’d prefer, you can also check out this live code session on YouTube, where I go over most of the code and concepts in this post.
Are you ready to try the best combination since hot honey on pepperoni pizza? If so, I hope you decide to read on.
Before you begin
To build either static or server-rendered sites with Astro and Deno, you’ll need to have a couple of tools installed.
| You need… | Because… |
|---|---|
|
The Deno CLI
|
We’ll use the Deno CLI for running your Astro site locally on the Deno runtime. |
| An npm client |
You’ll also need an npm-compatible client, like original gangster npm, yarn, or pnpm. Because Astro was designed for Node.js and npm, you’ll want to manage dependencies through a package.json and use npm-based commands as described in the Astro docs.If you don’t have Node and npm installed, I’d recommend installing pnpm. It works standalone, and is both fast and efficient with disk space. |
🤔 Why do I need both Deno and npm?
While you can build Astro sites with just npm (and Node.js), there are a few reasons why using the Deno runtime to build and run your Astro site is useful.- Deno runtime features: The Deno runtime supports advanced JavaScript and TypeScript syntax on the server. It also has built-in features that make development easier, like Deno KV, a key-value database that works both locally and in Deno Deploy without additional configuration.
- Using Deno Deploy in production: Deno Deploy is a global serverless JavaScript platform with super fast deployment times, powered by V8 isolates rather than virtual machines. It’s a great way to run your application code close to your users, giving them the fastest possible load times.
Once both Deno and an npm client installed, we can try using Astro and Deno together in two ways.
- Build and deploy a static site.
- Use Astro + Deno to build a more dynamic server-rendered application.
We’ll cover how to do both, but let’s start by building a simple static site and hosting it on Deno Deploy.
Building and deploying static sites
By default, Astro is configured to generate static HTML and CSS for your website. In this mode, you can serve your website in any environment that can host these files, including Deno Deploy. Let’s see how that would work. Begin by generating a default Astro project with the following command in your terminal.
npm create astro@latestThis will launch an interactive prompt where you can configure an Astro project. For our purposes, you can accept all the default configuration options. The process will end up looking something like this.
kevin@kevin-deno astro-demo % npm create astro@latest

╭─────╮  Houston:
│ ◠ ◡ ◠  Let's build something fast!
╰─────╯

 astro   v2.8.5 Launch sequence initiated.

   dir   Where should we create your new project?
         ./extraterrestrial-equator

  tmpl   How would you like to start your new project?
         Include sample files
      ✔  Template copied

  deps   Install dependencies?
         Yes
      ✔  Dependencies installed

    ts   Do you plan to write TypeScript?
         Yes

   use   How strict should TypeScript be?
         Strict
      ✔  TypeScript customized

   git   Initialize a new git repository?
         Yes
      ✔  Git initialized

  next   Liftoff confirmed. Explore your project!

         Enter your project directory using cd ./extraterrestrial-equator
         Run npm run dev to start the dev server. CTRL+C to stop.
         Add frameworks like react or tailwind using astro add.

         Stuck? Join us at https://astro.build/chat

╭─────╮  Houston:
│ ◠ ◡ ◠  Good luck out there, astronaut! 🚀
╰─────╯
kevin@kevin-deno astro-demo %
With your new project generated, you can enter the new project’s folder as
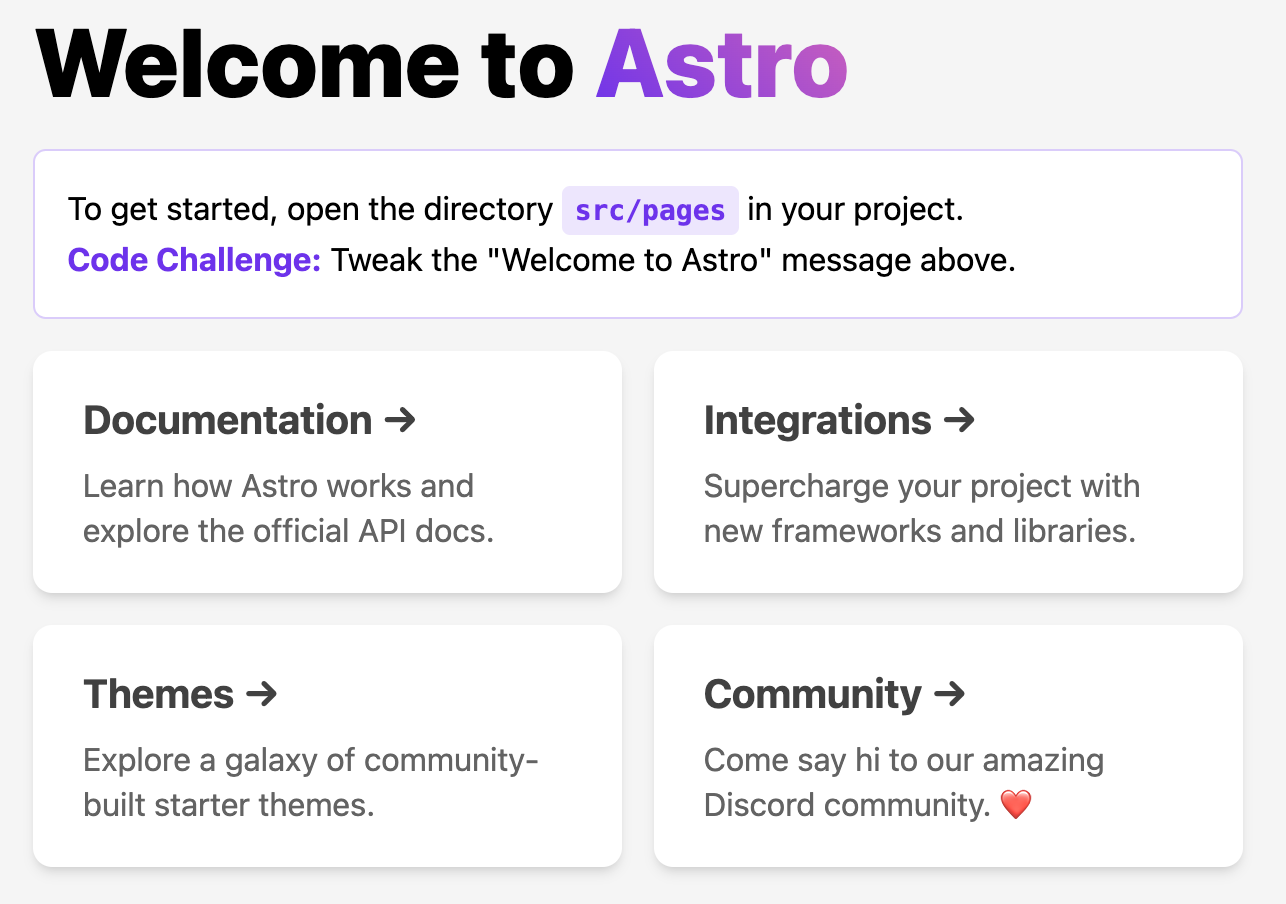
directed - cd ./extraterrestrial-equator in the example above - and test out
your new application with npm start. The basic Astro demo app will look
something like this, running on http://localhost:3000
by default.
To build a static site for production, use the npm run build command. This
will create a dist folder in your current directory with all the HTML, CSS,
and (eventually) JavaScript code required to run your app. This default
application will be more than sufficient for us to see how we can publish this
static site on the Internet with Deno Deploy.
Next, let’s set up automatic deployments from GitHub. Start by pushing the Astro project you just generated to a public or private GitHub repository. If you’re new to using GitHub to do this, refer to their documentation here.
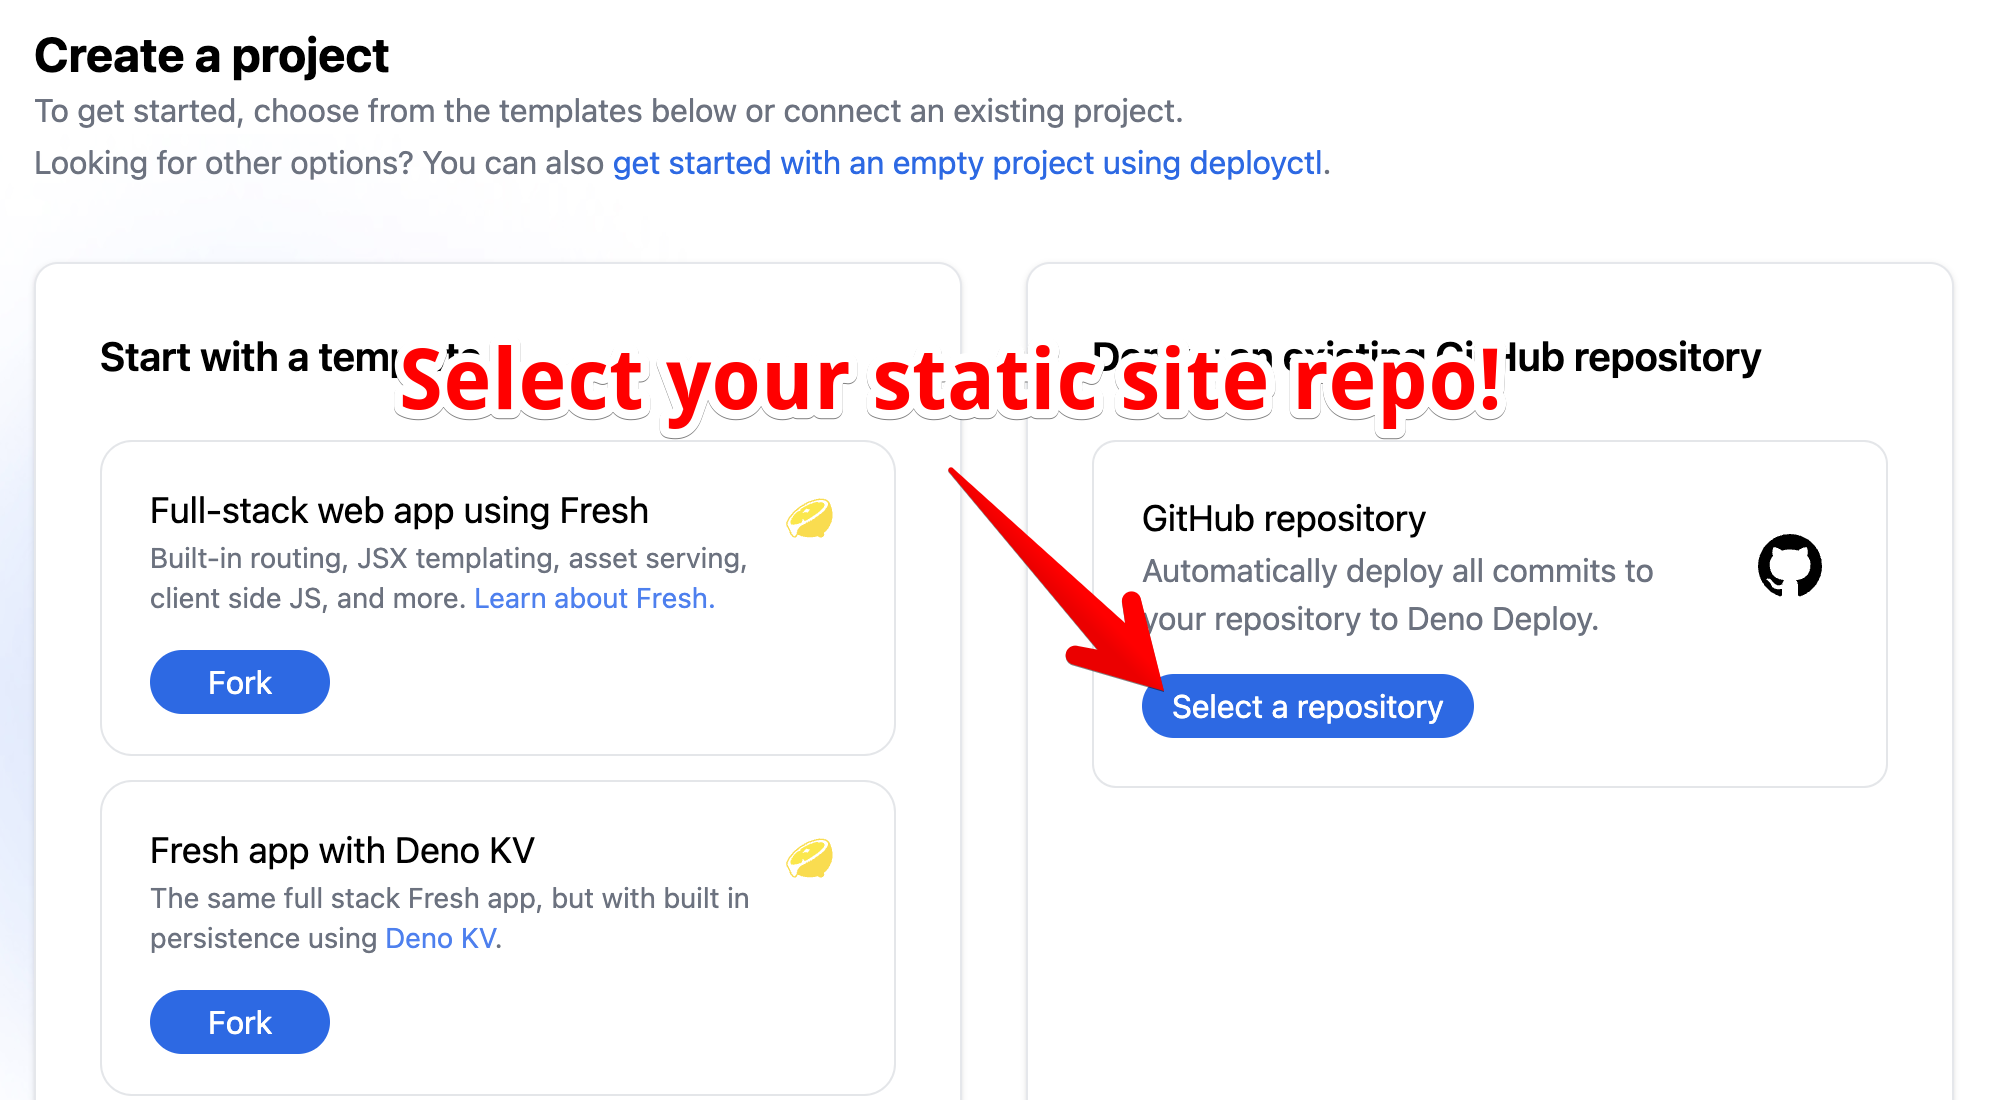
Once your Astro site is uploaded to a GitHub repository, sign up for Deno Deploy and navigate to your project dashboard. Click the “New Project” button, and then choose to deploy an existing GitHub repository as shown below.
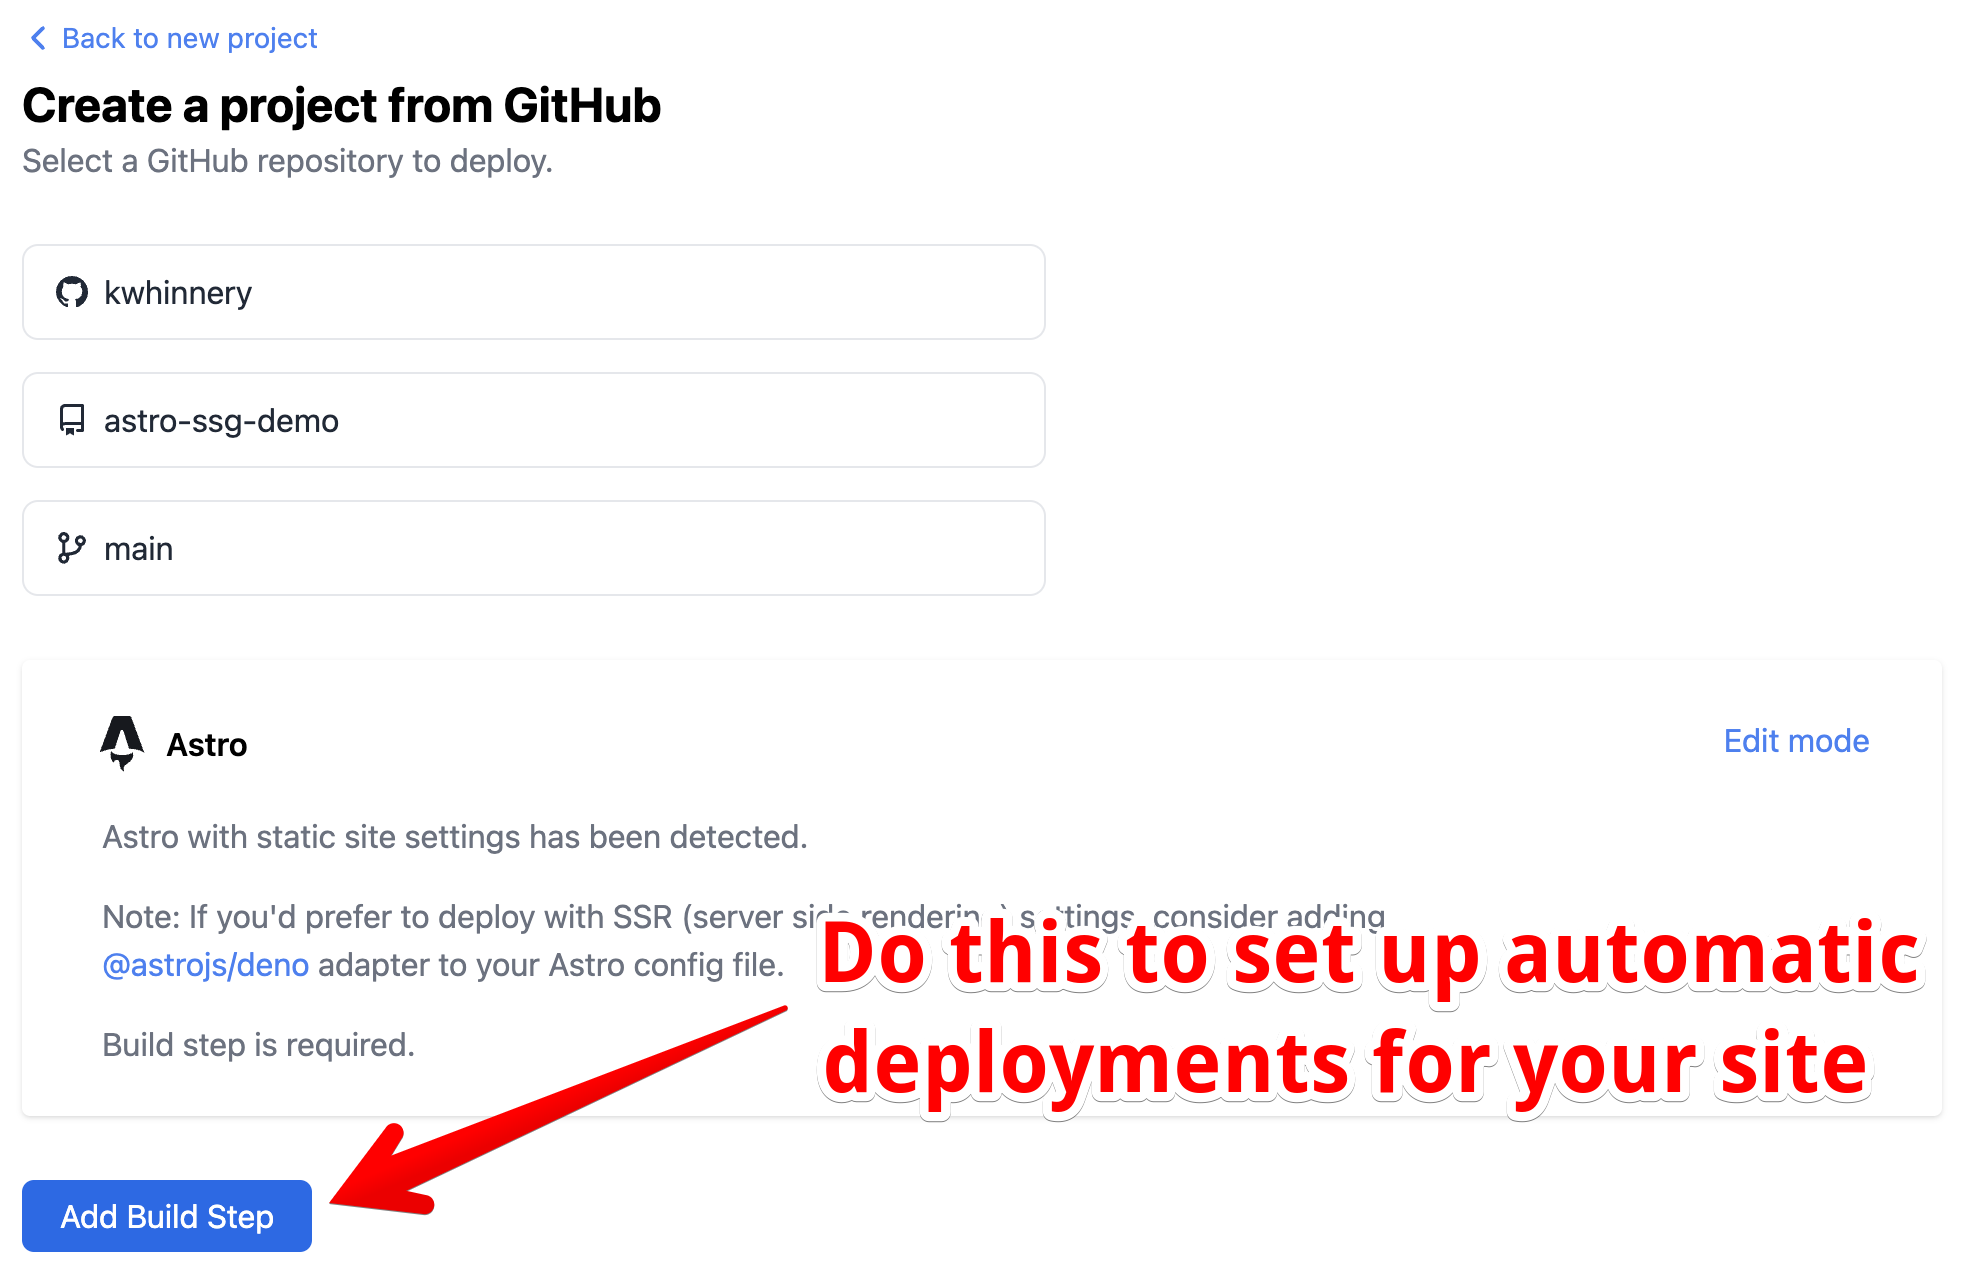
Deno Deploy should helpfully detect that you are trying to deploy a static site
built with Astro. To set up automatic deployments though, you’ll need to
configure a GitHub Action to perform the
necessary build step whenever you push new code to the main branch of your
repo. Click the button prompting you to do so next.
On GitHub, you can set up a
workflow config file
that will execute a build task every time you push to the main branch. Unless
you changed something about how and where Astro builds static site assets, you
should be able to use this file unchanged - Deno Deploy will inject your new
project name for you. Once you are satisifed with this configuration, you can
commit it directly to your repo from this UI by clicking the green “Commit
changes” button in the top right corner of the screen (scroll up the page all
the way if you don’t see it).
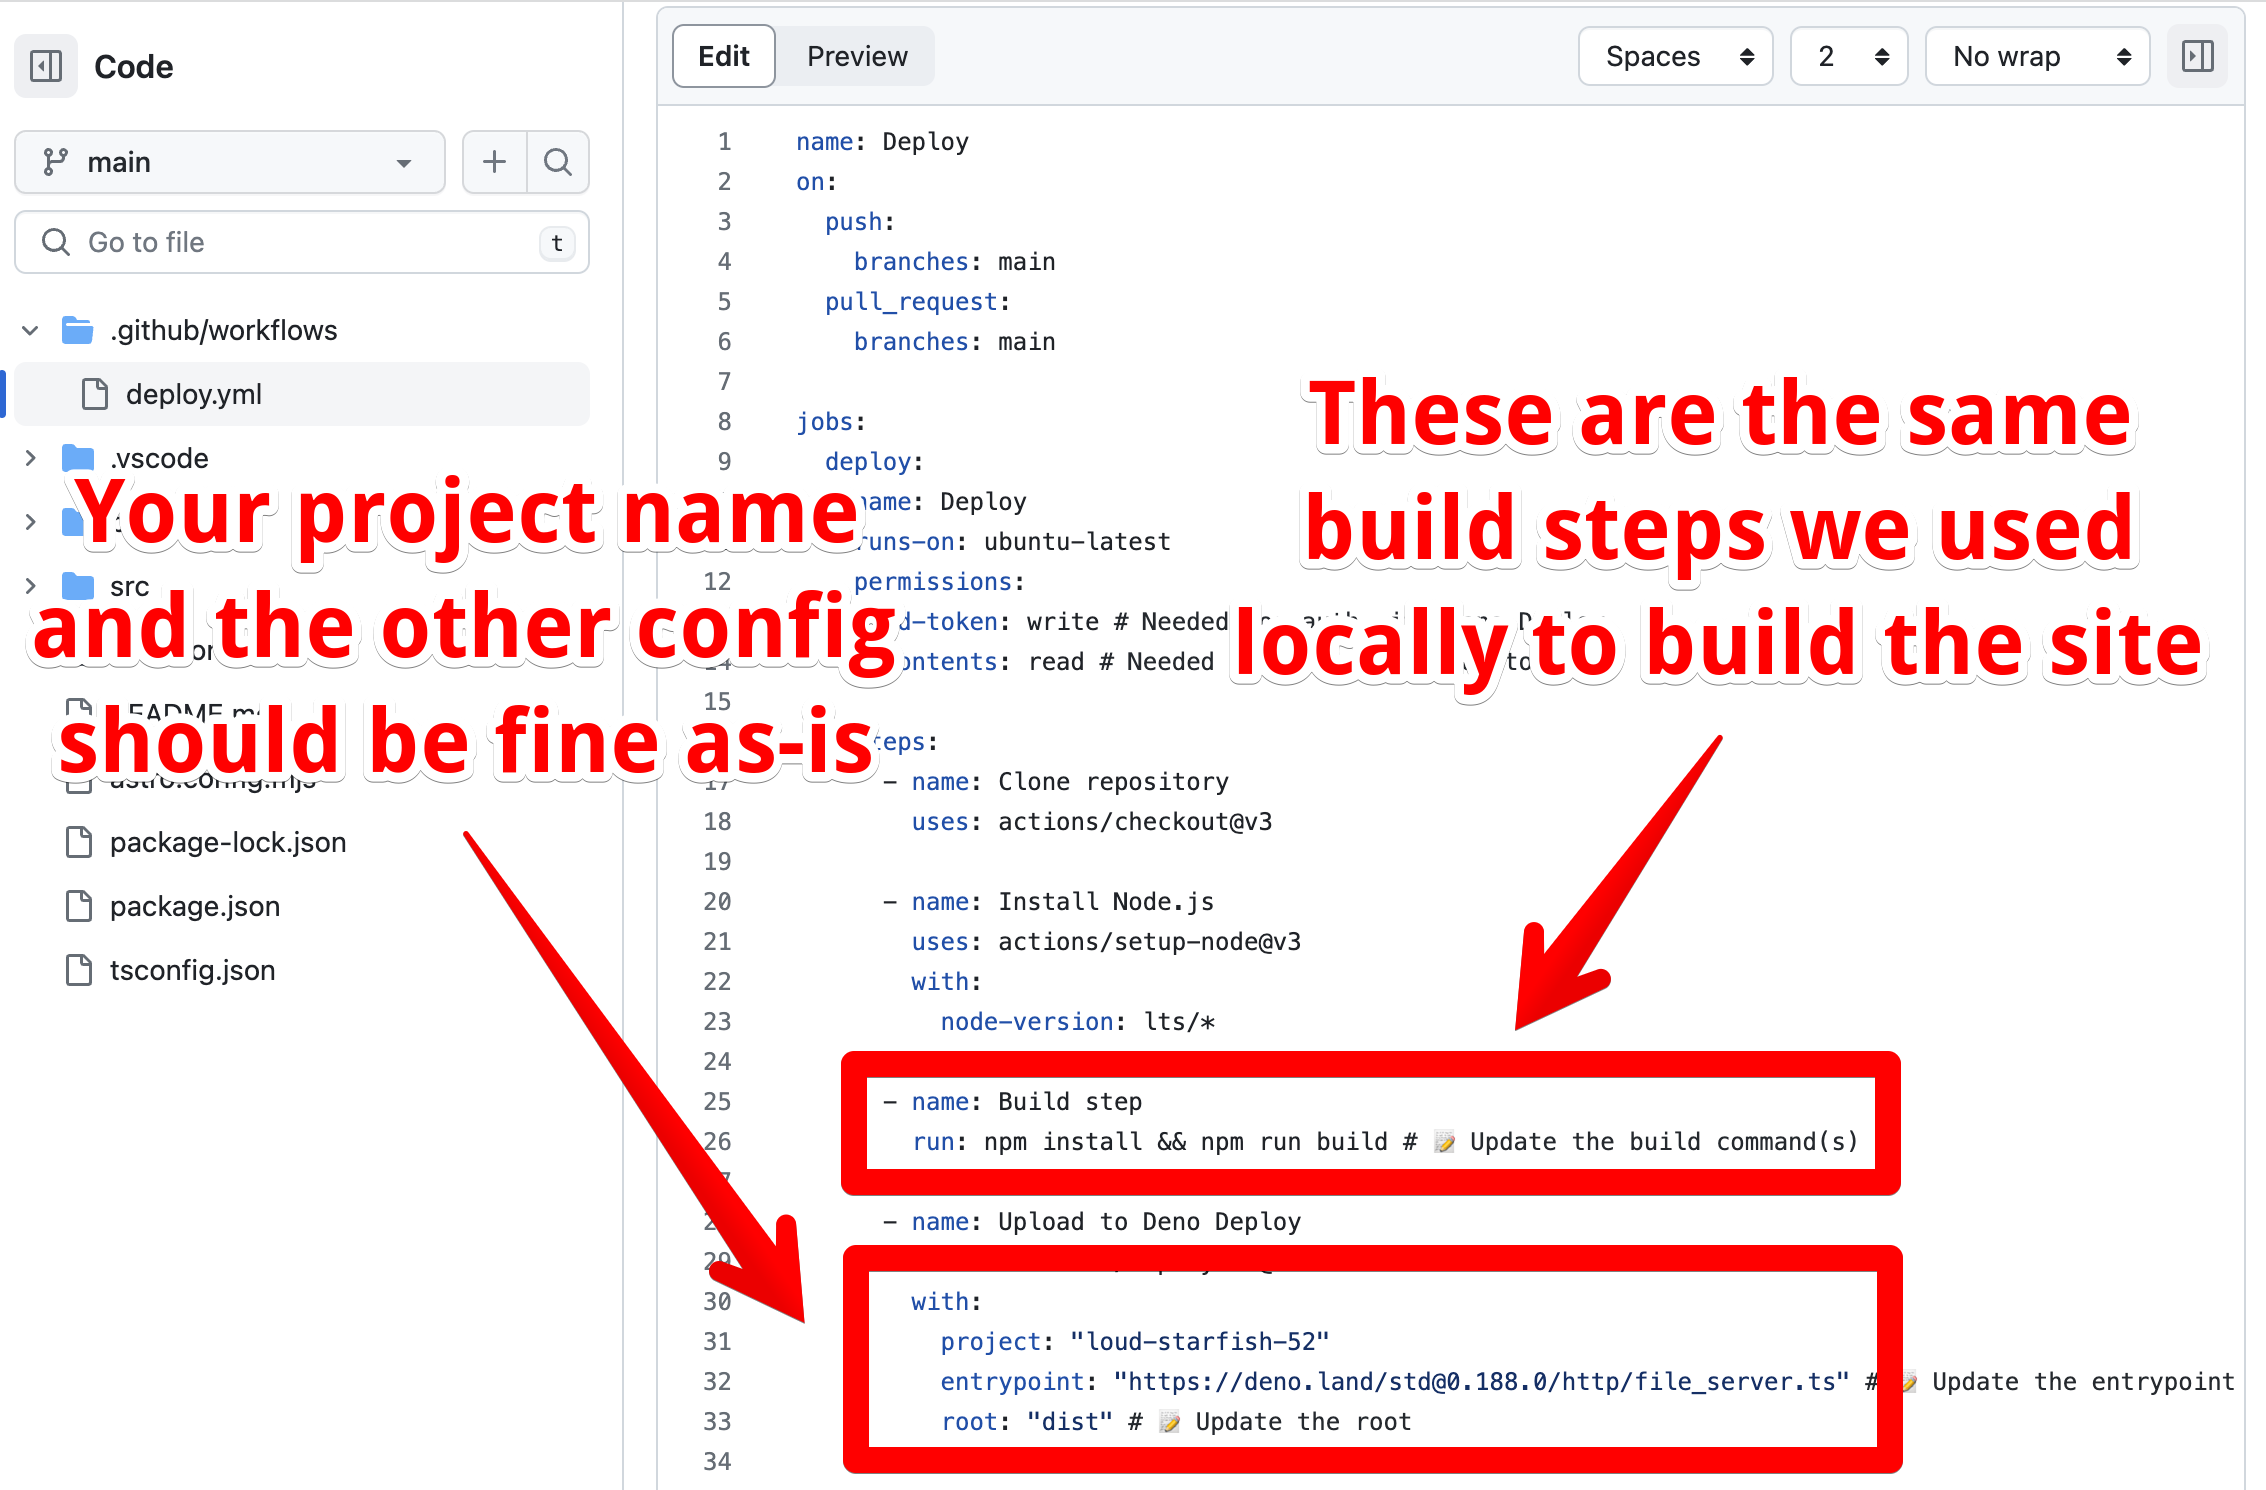
🤔 What’s the deal with that “file_server.ts” line in the config above?
The Deno standard library provides a utility that will serve static assets from a folder. Deno Deploy uses this by default to serve the static assets in your Astro site. If you’d like to set up your own static file server, feel free! You can learn how to do so in this blog post.After the changes to this file are committed, a new build should be triggered in your GitHub repository. Shortly after, your Deno Deploy dashboard should be updated with the most recent code, built and deployed from GitHub.
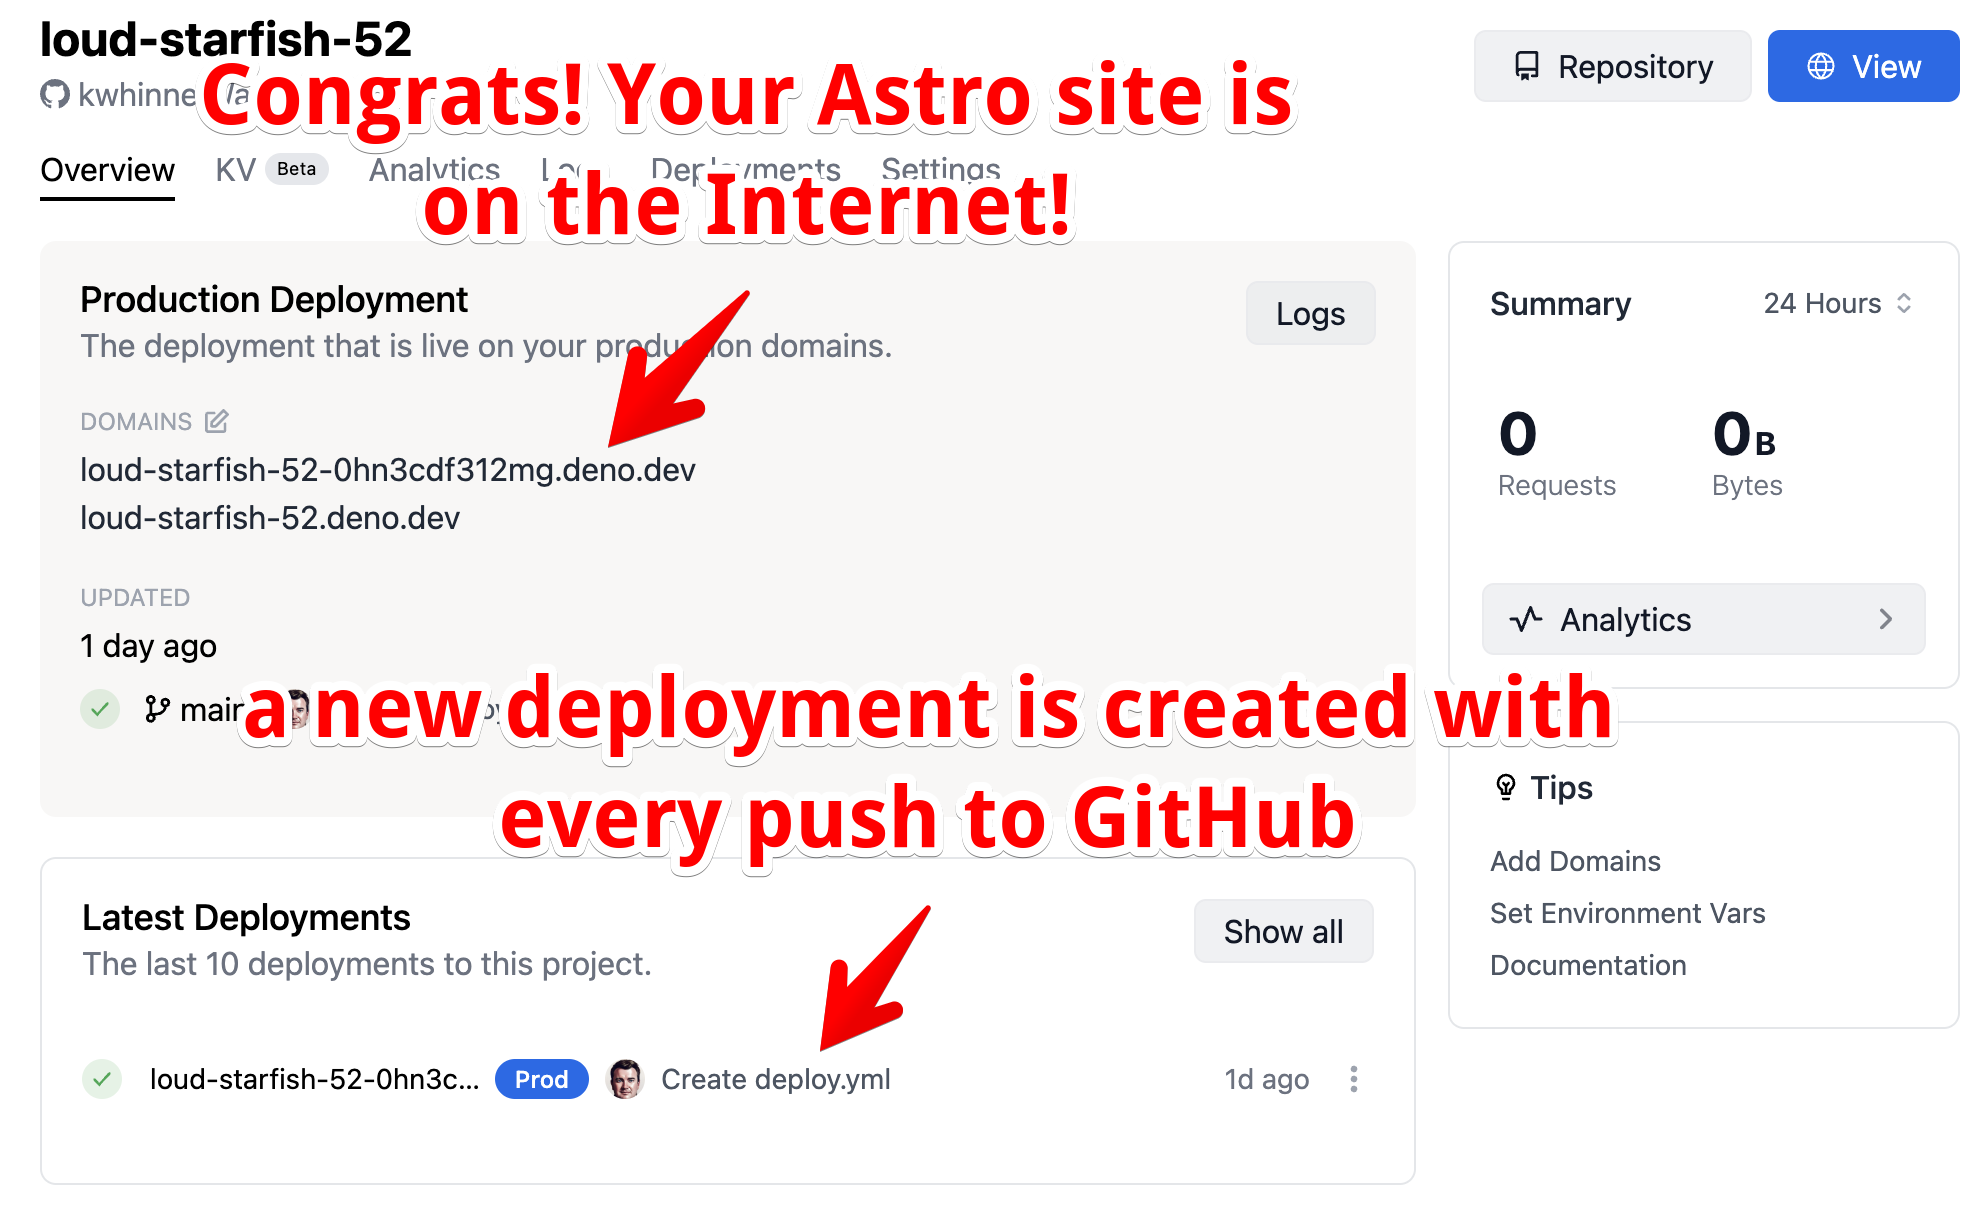
Great work! You’ve just built and deployed a static site with Astro, and put it on the Internet with some help from Deno Deploy. As exciting as that is, many modern web applications can’t get by on static HTML alone. To dynamically generate pages in our site, we’ll need to start writing some logic on the server. And that is where Deno really starts doing some work for you, especially when you use our built-in database Deno KV.
Let’s see how we’d build an Astro site with server-side rendering next.
Building dynamic sites with server-side rendering
While Astro’s default configuration is for generating static sites, it is also great at rendering some or all of your pages on the server. To accomplish this, Astro provides adapters for many popular hosting services, Deno Deploy among them. Instead of just generating static HTML, CSS, and JavaScript that run in the browser, Astro sites using SSR will also generate server-side code during the build process. This code will run before your page is served, and allow you to dynamically generate the content you send to the browser.
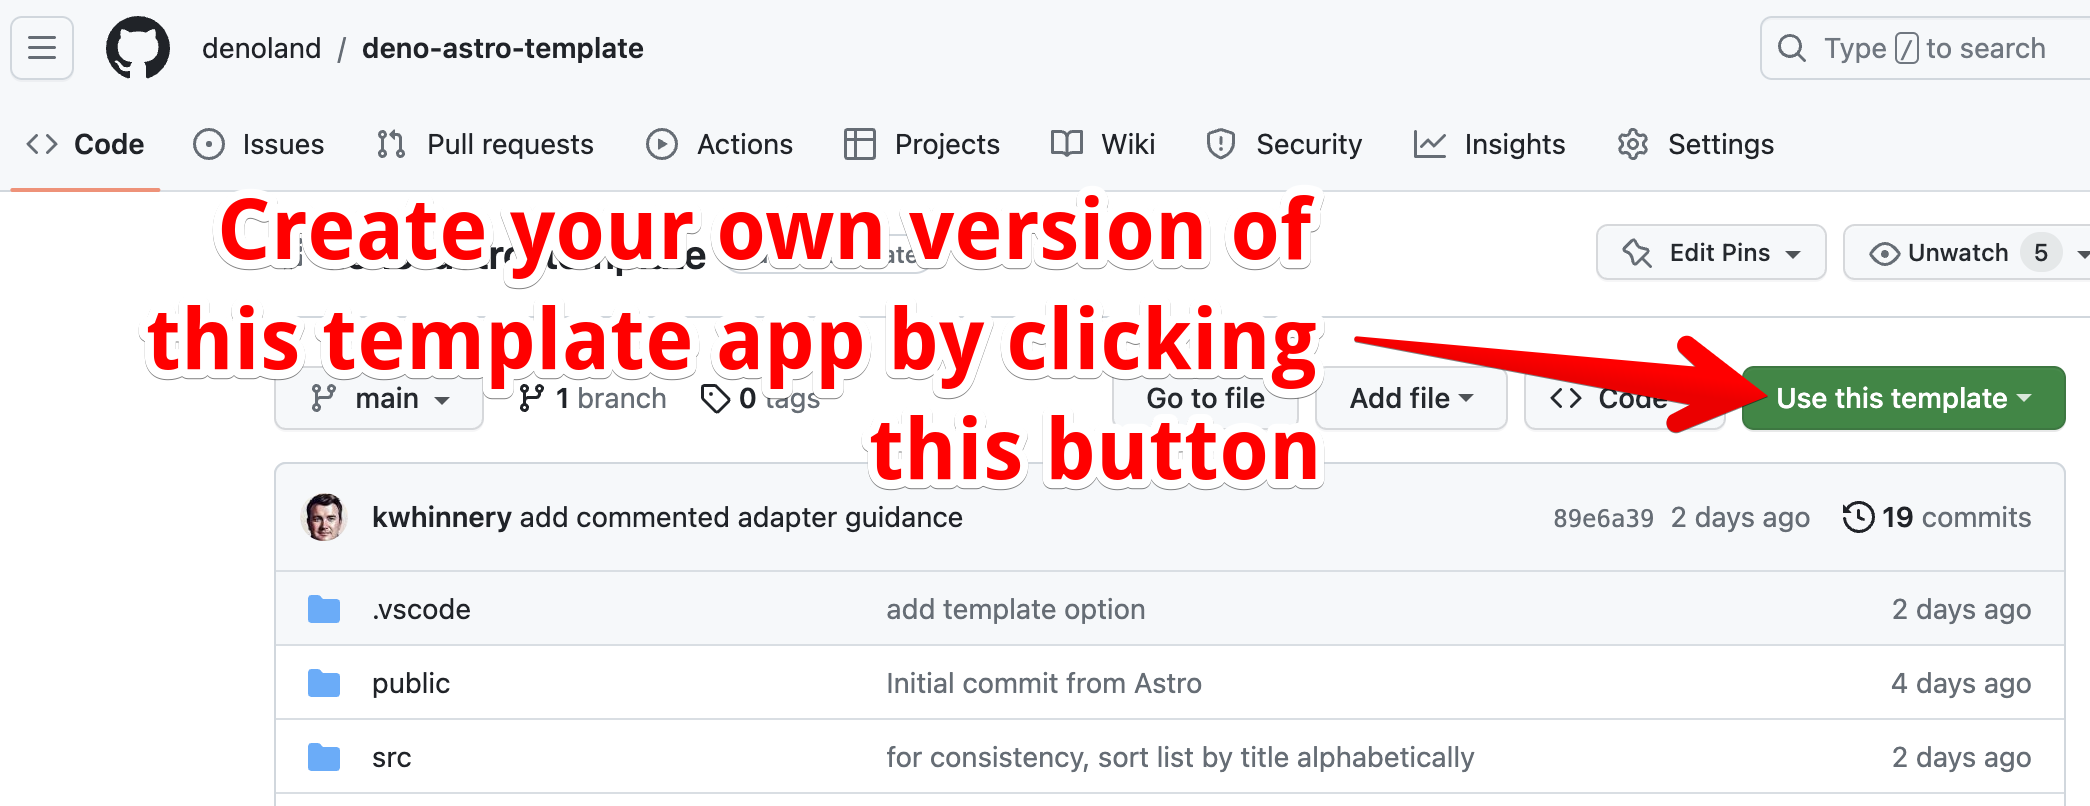
To get started with dynamic web apps with Astro and Deno, we recommend using this template application. It is preconfigured with all the changes you’d need to make to do SSR with Deno and Astro, as well as a tiny bit of CRUD functionality that shows how you’d build a data-driven web app in Astro. You could use this template to generate a new project in the terminal with this command…
npm create astro@latest -- --template denoland/deno-astro-template…but since we’re going to demonstrate how to automatically deploy this app from GitHub, you can save yourself a few steps by creating a new repo from this template directly on the GitHub website. Click the button shown below, and follow the prompts to set up your own version of this application.
Before digging too deeply into how this application works, let’s ship it to Deno Deploy and see what it does. Back in the Deno project dashboard, once again choose to create a new application and deploy from an existing GitHub repository. After choosing the project you just created, Deno Deploy will this time detect that you are building an Astro app that uses SSR.
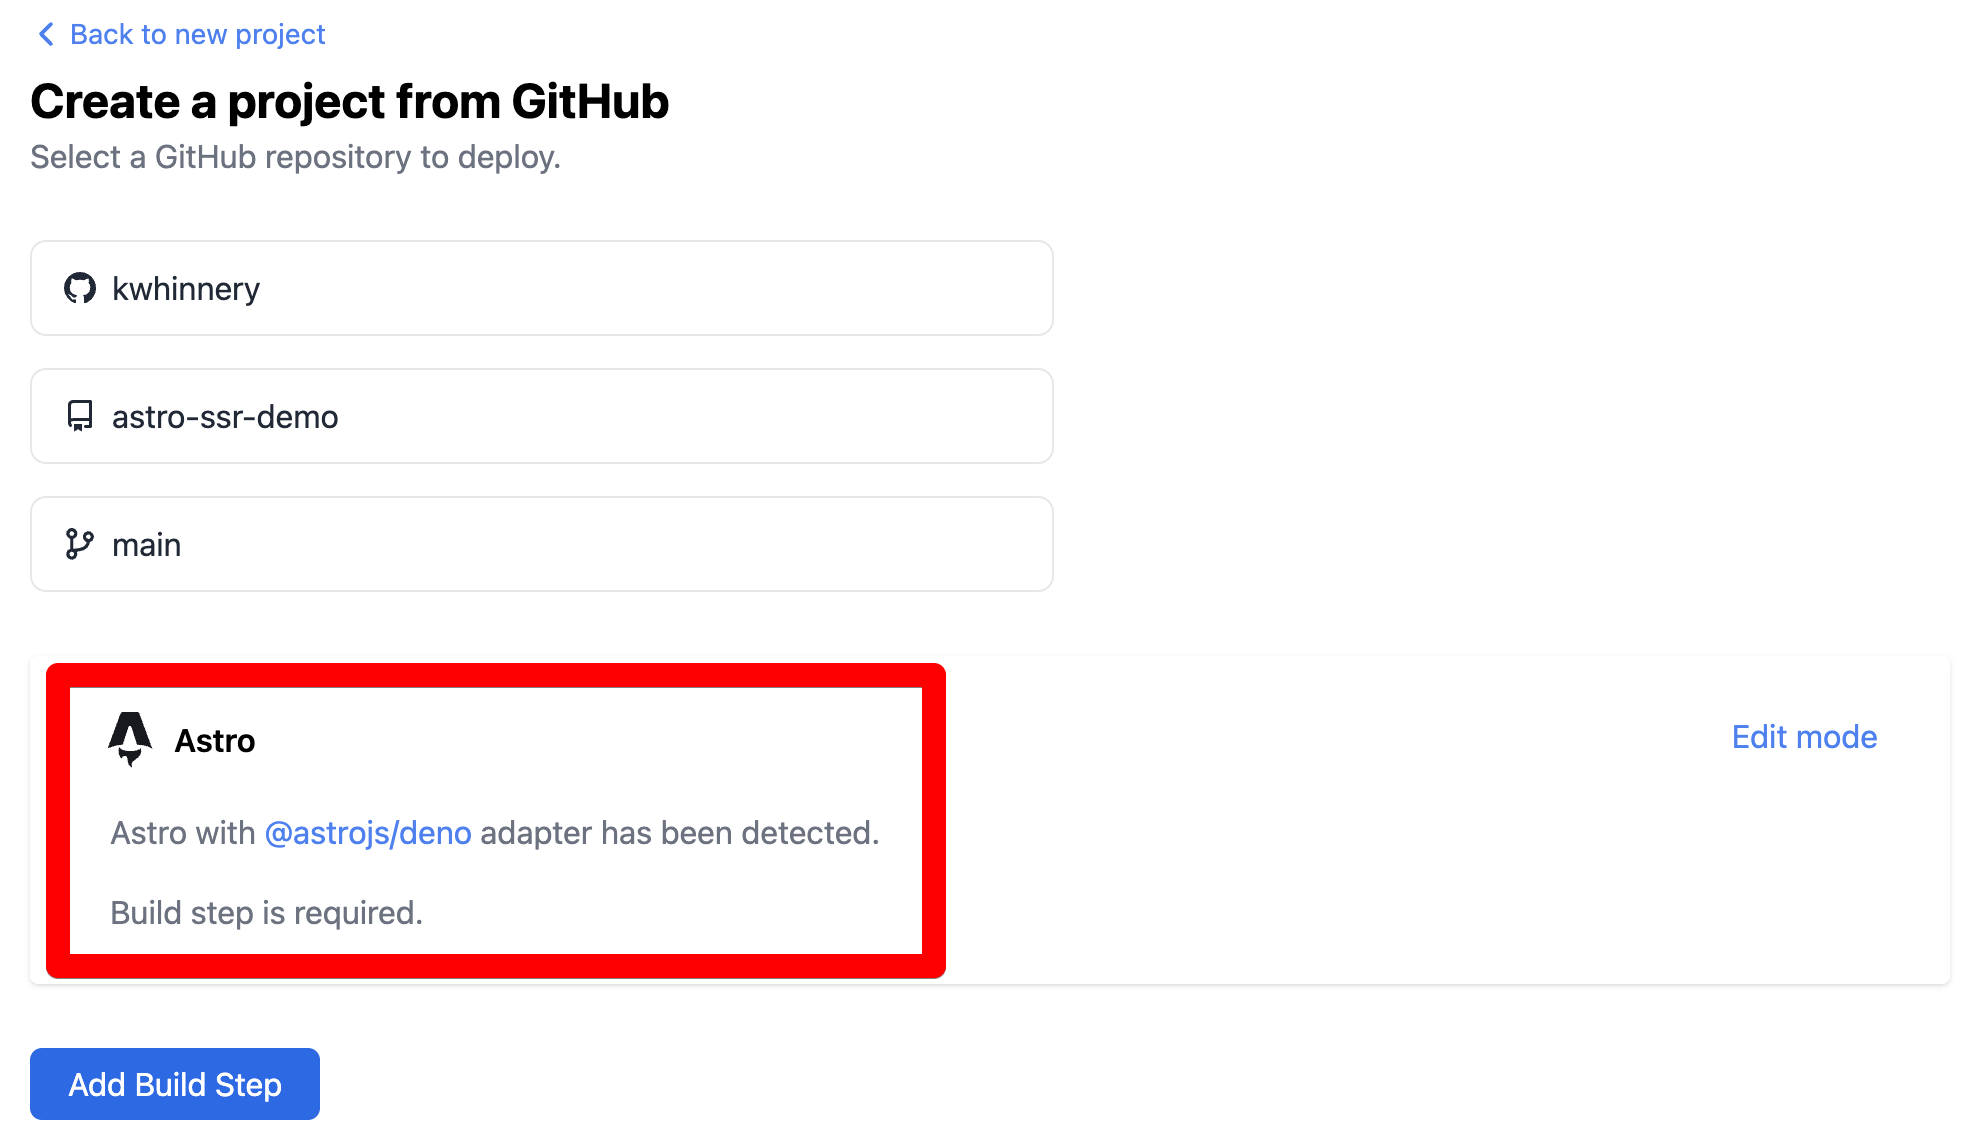
As before, you will be prompted to set up a build.yml file that will deploy
your site every time a change is pushed to the main branch. However, this time
the configuration will be slightly different, because we will be using a Deno
script generated by Astro as the entry point for our application.
- name: Upload to Deno Deploy
  uses: denoland/deployctl@v1
  with:
    project: "empty-hedgehog-41"
    entrypoint: "server/entry.mjs" # This file is generated by "npm build"
    root: "dist" # SSR apps still output to the "dist" folder by default
After you commit this file to your GitHub repo, your site will build, and you’ll be able to see it live within a few moments. The template application will look something like this.
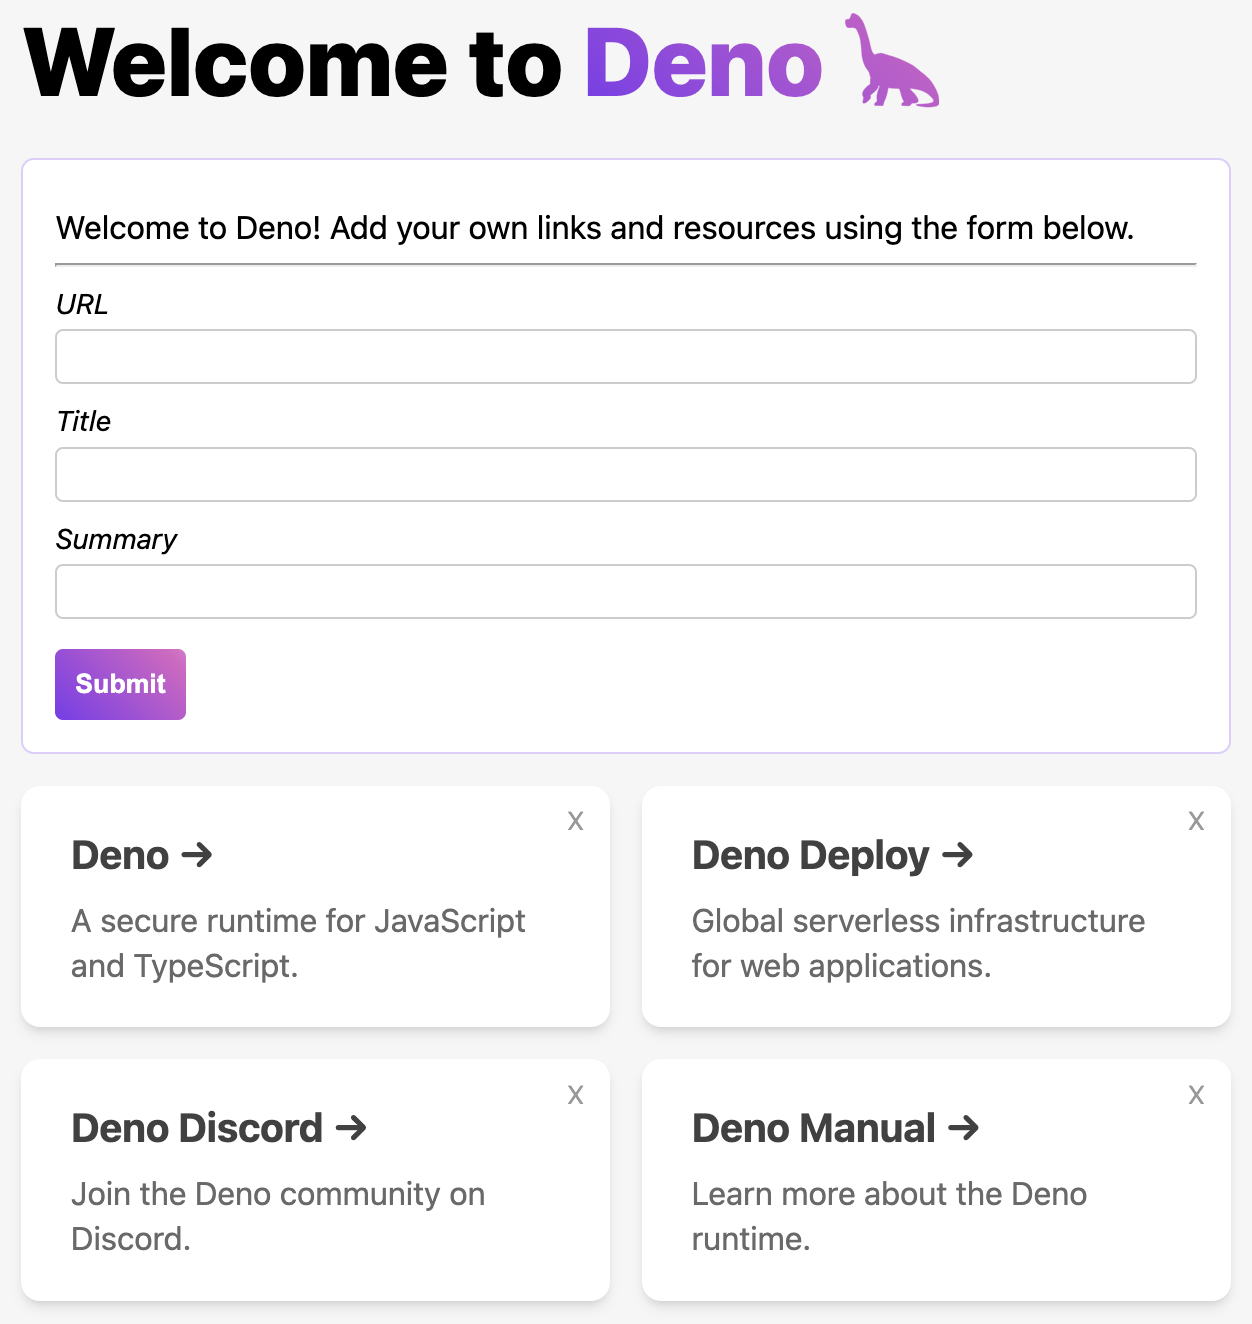
It will look very similar to the default static site we deployed with Astro
earlier, except that it enables you to add link cards using the form at the top
of the page. You can also delete cards by clicking the X in the top right
corner of each card.
At this point, you can clone your version of the template project and poke around the code a bit. After cloning the project, install the required dependencies with:
npm installYou can then run the application on your computer the same way you did before, with:
npm startThis application has a few more moving parts, though - let’s check out some of the more important functional changes.
Configuring Astro for SSR
In order to let Astro know it should prefer to render pages on the server, you
will need to make some
configuration changes.
In our template project, this file is called astro.config.js rather than
astro.config.mjs as in the Astro docs -
all JavaScript files in Deno are ESM modules by default.
Here’s what you’ll find in this file.
import { defineConfig } from "astro/config";
// import deno from "@astrojs/deno";
import deno from "deno-astro-adapter";

// https://astro.build/config
export default defineConfig({
  output: "server",
  adapter: deno(),
});
Above, we set the output mode to server, which tells Astro that we want to
default to rendering pages dynamically on each request, unless we say
differently on a given page. We also configure a Deno adapter, which helps to
generate server-side code that will run with each request to our site, and
dynamically generate a response.
The Astro team maintains an adapter for Deno, but as of this writing (July 2023), there is a minor issue outstanding where valid Deno code that uses modern language features does not work with their adapter. The code above uses a patched version, which should not be necessary for much longer.
Running the dev server in Deno
One of the main reasons to use Deno with Astro is so that your server-side code
can take advantage of the features of the Deno runtime. In order to effectively
test our code this way, we need to run our local development server using Deno.
The way we’ll handle this is by replacing a few of the
npm scripts configured in
package.json, and have them execute the same tasks using Deno instead of Node.
{
  "name": "deno-astro-template",
  "type": "module",
  "version": "1.0.0",
  "scripts": {
    "dev": "deno run -A --unstable npm:astro dev",
    "start": "deno run -A --unstable npm:astro dev",
    "build": "astro build",
    "preview": "deno run -A --unstable ./dist/server/entry.mjs",
    "astro": "astro",
    "format": "deno fmt && prettier --write ."
  }
}
Running code to generate a page on the server
Within an
Astro component,
the fenced “front matter” code at the top of a .astro file (called a
“Component Script”) will run at build time for statically generated pages, or on
every request for a server-rendered page. This template modifies the
index.astro Component Script to have both a form that will allow users to
submit new link card content, and a data query that will fetch fresh content for
the page on every request.
The form on this page will also send a POST request to the same URL, which
will cause this code to respond differently in response to a form submission
(saving a new resource, then redirecting to a GET).
Component Script in index.astro
import Layout from "../layouts/Layout.astro";
import Card from "../components/Card.astro";
import { addResource, listResources, Resource } from "../data/resources";

// Process form submission if required
if (Astro.request.method === "POST") {
  try {
    const data = await Astro.request.formData();
    const resource: Resource = {
      url: data.get("url")?.toString() || "",
      title: data.get("title")?.toString() || "",
      summary: data.get("summary")?.toString() || "",
    };
    await addResource(resource);
  } catch (error) {
    console.error(error);
  }

  // Redirect to home page to avoid duplicate form submissions
  return Astro.redirect("/");
}

// Get a list of resources
const resources: Resource[] = await listResources();
Client-side JavaScript to delete link cards
This template also uses JavaScript intended to run on the client to delete link cards without requiring a full page refresh.
Client-side script in Card.astro
document.querySelectorAll('span.delete').forEach((span) => {
  span.addEventListener('click', async (e) => {
    e.preventDefault();
    e.stopPropagation();

    const title = (span as HTMLElement).dataset.title || '';
    const encTitle = encodeURIComponent(title);
    const url = `/api/resources.json?title=${encTitle}`;

    try {
      const res = await fetch(url, { method: 'DELETE' });
    if (res.ok) {
      span.parentElement?.remove();
    }
    } catch (err) {
      console.log(err);
    }
  });
});
API endpoint to handle deleting link cards
This template has an API endpoint as well which handles the async DELETE
request used in the JavaScript code above.
API route in resources.json.ts
import { APIRoute } from "astro";
import { deleteResource } from "../../data/resources.ts";

export const del: APIRoute = async ({ request }) => {
  const title = new URL(request.url).searchParams.get("title");
  if (!title) return new Response(null, { status: 400 });

  await deleteResource(title);
  return new Response(null, { status: 204 });
};
Switching to Deno KV
The template project, by default, will save data to an in-memory Map object. But with a few minor changes, the template app can be configured to store data in Deno KV instead. This code uses Deno KV to expose the same API being used by the in-memory data store, but makes those changes persistent with Deno KV.
Deno KV data access in resources_kv.ts
const db = await Deno.openKv();

export interface Resource {
  url: string;
  title: string;
  summary: string;
}

export async function addResource(resource: Resource) {
  return await db.set(["resources", resource.title], resource);
}

export async function listResources(): Promise<Resource[]> {
  const iter = db.list({ prefix: ["resources"] });
  const resources = [];
  for await (const res of iter) resources.push(res.value as Resource);
  return resources;
}

export async function deleteResource(title: string) {
  return await db.delete(["resources", title]);
}
Note that in order to use Deno KV on Deno Deploy, you’ll need to be a part of the private beta. But before long, Deno KV will be available to all Deploy users, so if you’re reading this a few weeks after publication, chances are good that you’ll be able to use KV on Deploy right away :)
Deno and Astro, to the moon!
There’s a lot to love about Astro as a web framework. Astro components are powerful and flexible without much help, but can also be used with your favorite UI frameworks. The option to do either static sites or server-rendered pages (or some combination of both) makes it possible to deliver full-on dynamic websites with Astro as well. Combining this excellent API design with the power of the Deno Runtime and Deno Deploy is a killer combination that I would encourage you to explore in further depth.
Are you using Astro and Deno together? Be sure to let me know, or drop into the Discord to let us know what you’re building!