
Introducing JSR - the JavaScript Registry


Introducing JSR - the very short version
See the longer version of how and why we built JSR below!
JSR - the JavaScript Registry is now in public beta - sign up now! JSR is optimized for TypeScript and supports ES modules only. It works with Deno and npm-based projects (Node, Bun, Cloudflare Workers, etc), and is free and open source.
You can install packages like this:
# deno
deno add @luca/flag

# npm (and npm-like systems)
npx jsr add @luca/flag
You can import packages like you would any other ES module:
import { printProgress } from "@luca/flag";

printProgress();
Easily publish your own TypeScript and JavaScript modules from the command line:
# with deno installed (https://docs.deno.com/runtime/manual)
deno publish

# with npm-like systems
npx jsr publish
Modules are published to JSR as TypeScript source code. API documentation generation, type declarations for Node-like environments, and transpilation are all handled by JSR. Module authors can focus on writing TypeScript only.
Read on for more context on how and why we built JSR, how you can use it today, and how you can be involved in the project!
Introducing JSR - the slightly longer version
JavaScript has become the world’s default programming language. Running in browsers and on mobile devices, robots, and servers, you can use JavaScript to program just about anything.
Node was a major part of this transformation over the last 15 years, but you can’t talk about the success of Node without mentioning the equally incredible success of npm. With over 2.5 million packages and about 250 billion downloads in the last 30 days alone, it is arguably the world’s most successful package registry.
JavaScript might not enjoy the status it has today were it not for this incredible ecosystem that the JavaScript community built together. This should be a source of pride for every module author on npm.
From 2009 to 2024
A lot has changed in the world of JavaScript since npm’s initial release.
- ECMAScript modules have arrived as the web standard for writing reusable JavaScript code, superseding CommonJS.
- TypeScript has emerged as not only a way to write JavaScript with compile-time type checking, but as a test bed for the latest JavaScript language features coming out of TC39.
- Node is no longer the only relevant JavaScript runtime outside the browser. Runtimes like Deno, workerd (Cloudflare Workers), Bun, and more to come are innovating on DX, adhering more closely to web standards, and/or making design trade-offs to start fast on edge servers.
While npm remains a foundational component of web development today, it was not designed with these new realities in mind. We believe it is time to reimagine how a package registry should work in 2024.
- It should embrace ESM as the web standard for JavaScript modules
- It should be designed for TypeScript from first principles
- It should be simple, fast, and provide an excellent developer experience
- It should be free and open source, and work anywhere that JavaScript does
- It should build on the success of npm, not fork it
In pursuit of these design goals, we are very excited to share JSR - the JavaScript Registry. Starting today, it is freely accessible in public beta. We hope you’ll sign up and give it a try!
Using modules from JSR
On the JSR homepage, you can search for modules by name, or search based on their package description. Below, we search for HTTP server packages, and find oak, one of the more popular HTTP middleware frameworks from deno.land/x, already published on JSR.
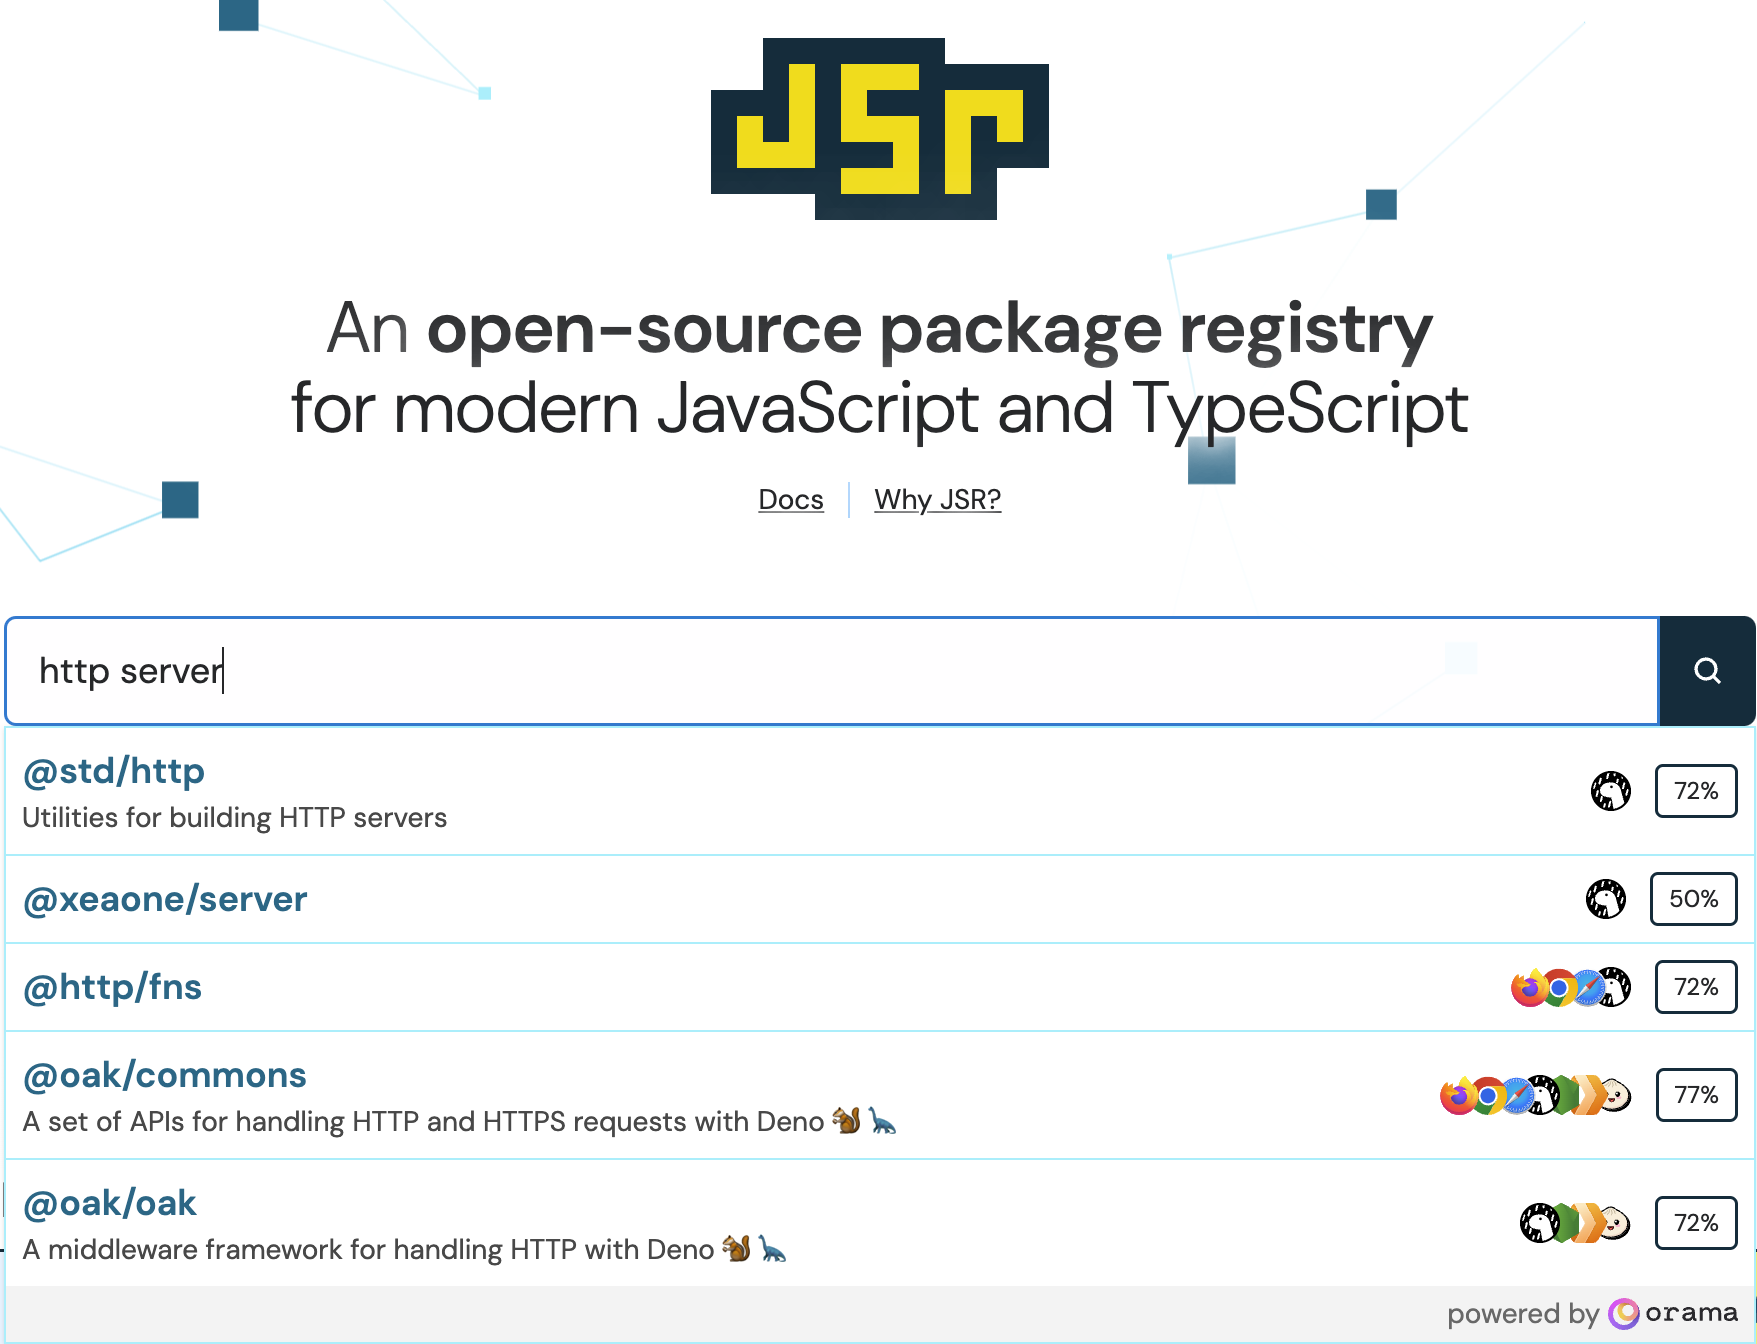
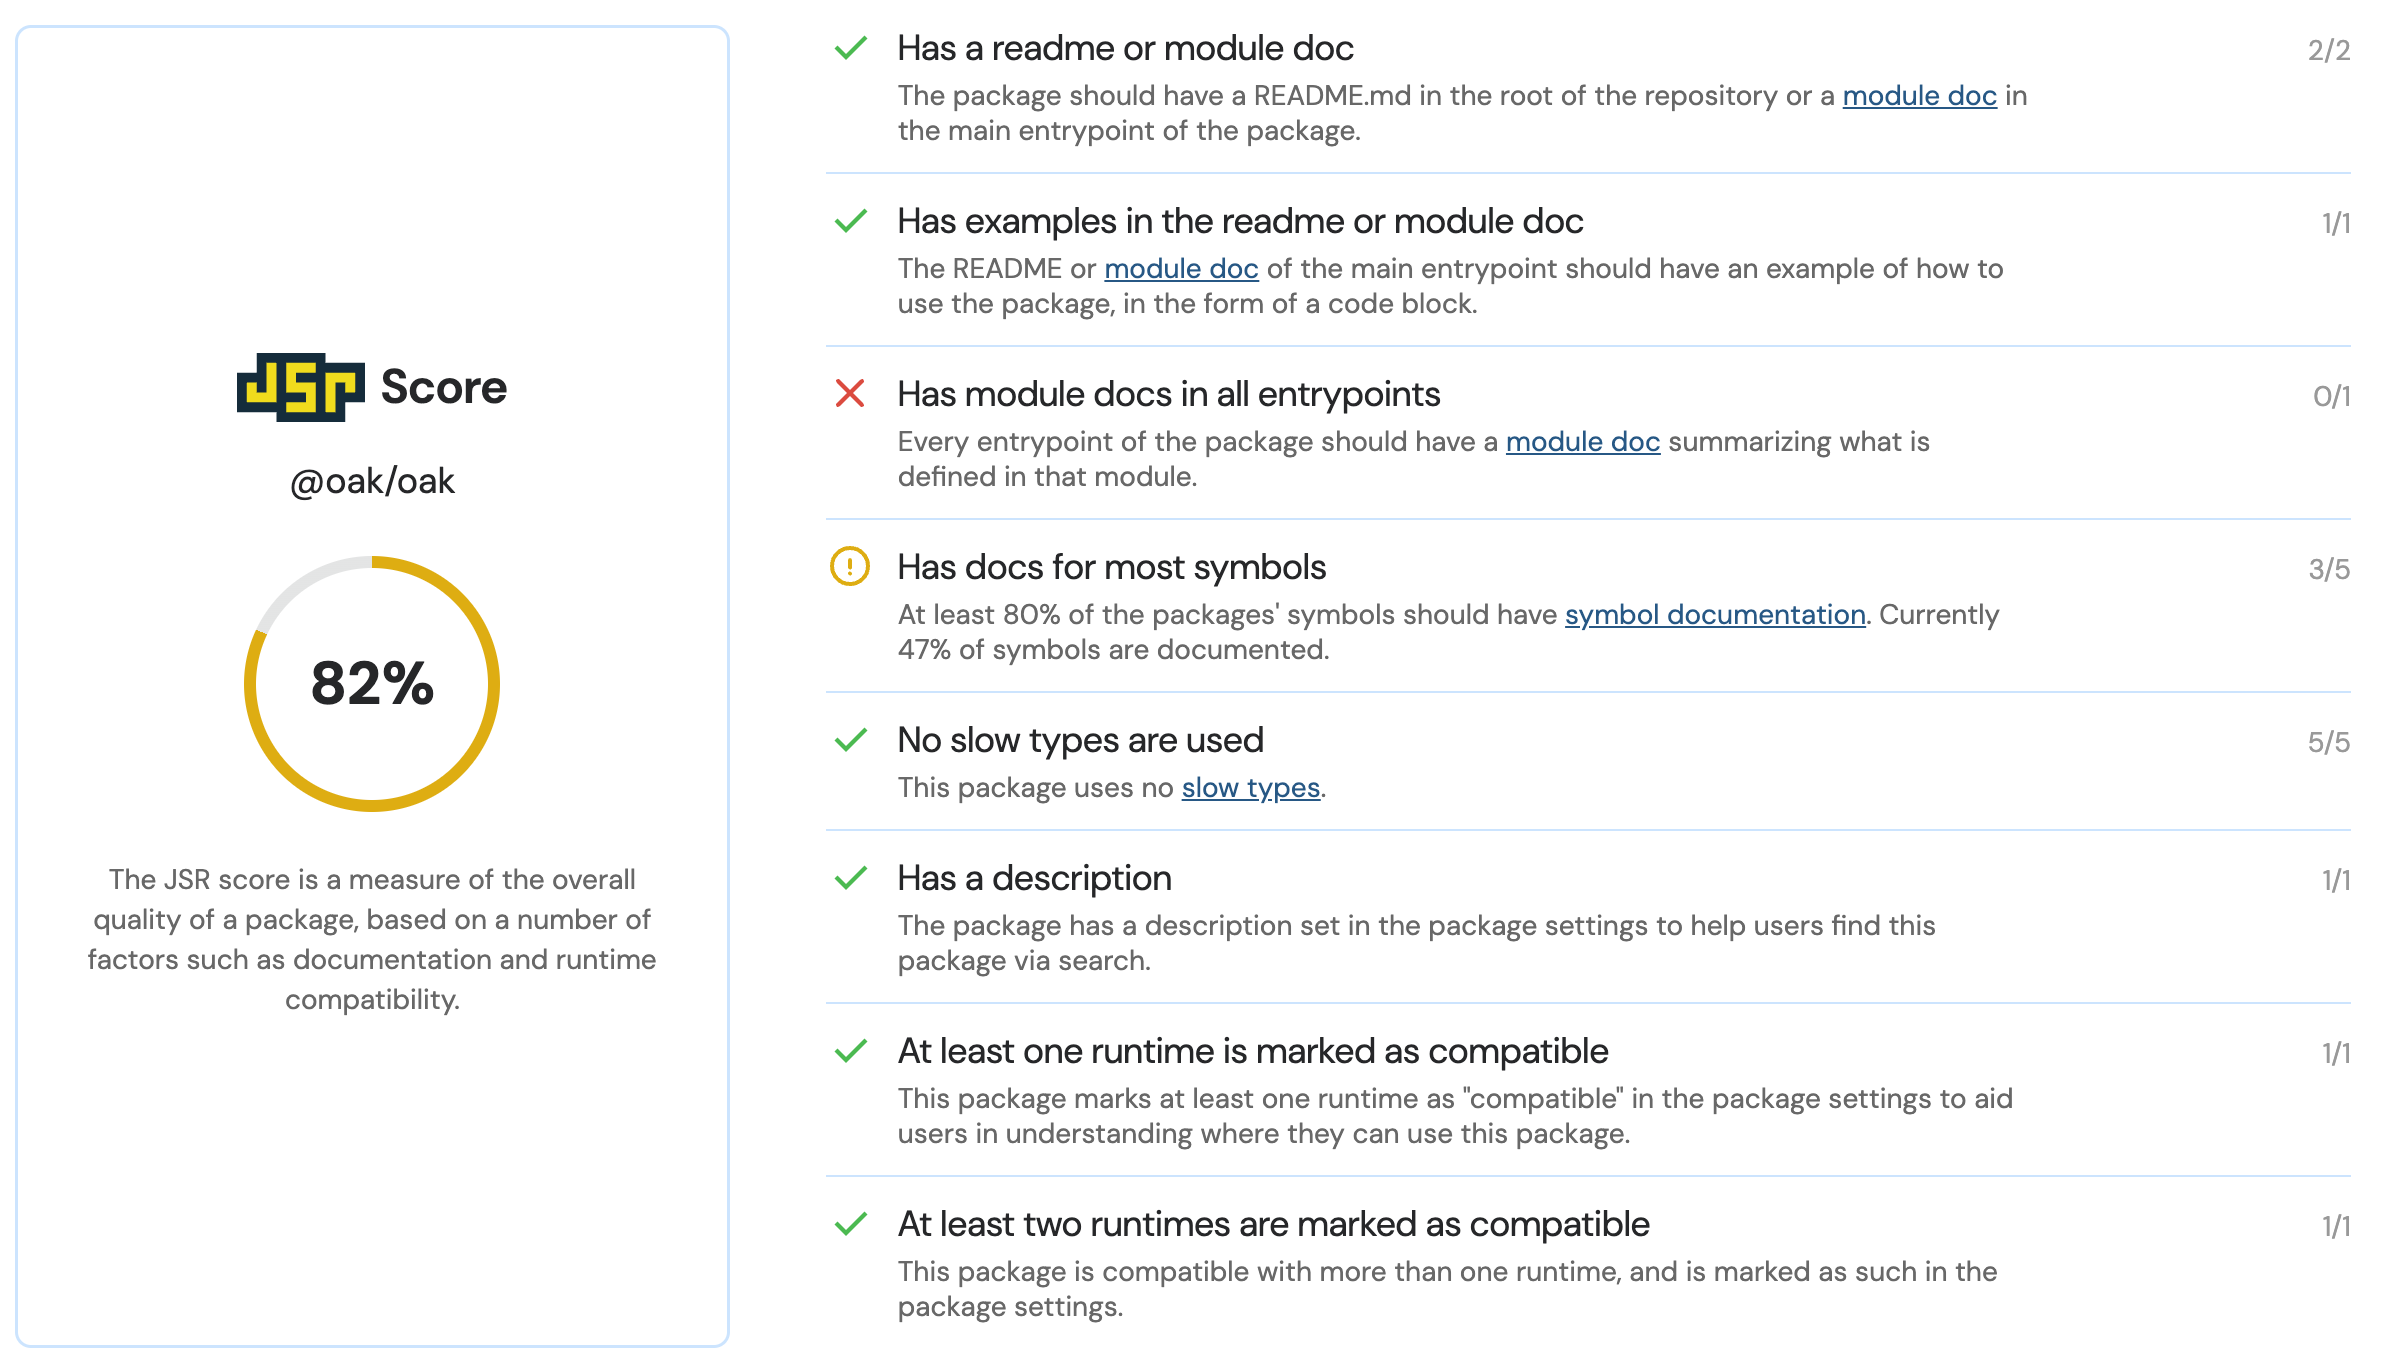
Note that each package has a quality score associated with it. The score is determined by an expanding number of factors, like completeness of documentation, optimal type declarations for fast type-checking, and compatibility with multiple runtimes.
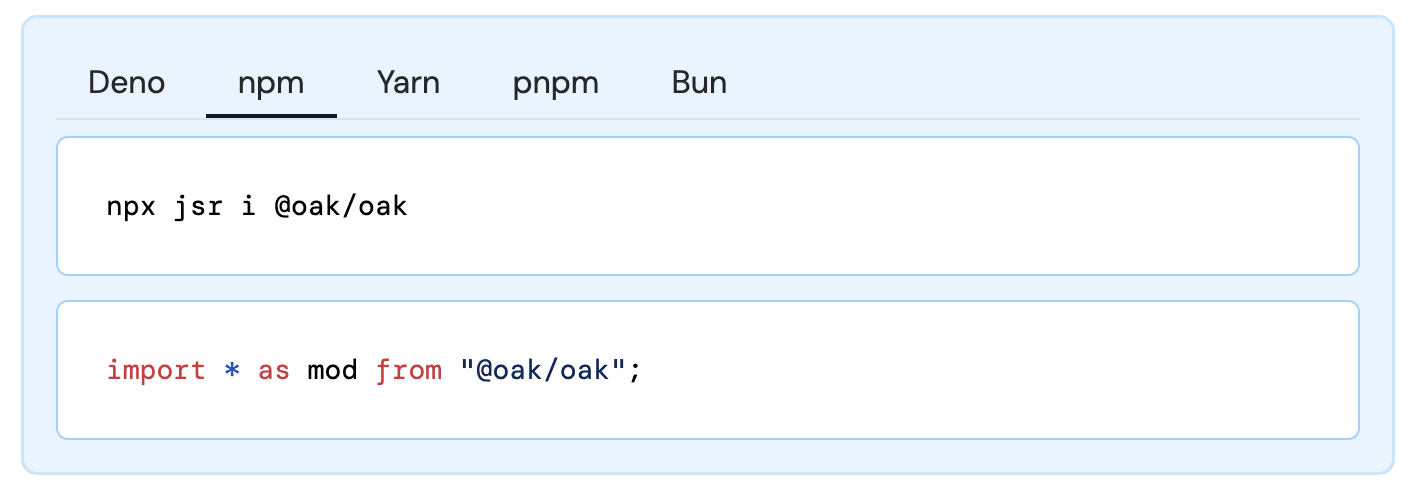
Once you’ve found the right module, installation and usage instructions can be found on the top of every page in the module’s automatically generated API reference documentation.
Let’s use oak in a Node.js project with npm. In your terminal, initialize a new Node project, and install oak with the following commands:
npm init --yes
npx jsr i @oak/oak
In this same directory, create a file named index.mjs and add the following
code which uses your recently installed oak module:
import { Application, Router } from "@oak/oak";

const router = new Router();
router.get("/", (ctx) => {
  ctx.response.body = `<!DOCTYPE html>
    <html>
      <head><title>Hello oak!</title><head>
      <body>
        <h1>Hello oak!</h1>
      </body>
    </html>
  `;
});

const app = new Application();
app.use(router.routes());
app.use(router.allowedMethods());

app.listen({ port: 8080 });
You can run this application with node index.mjs, and then visit your “hello,
world” oak application at http://localhost:8080.
Publishing to JSR
As a package creator, JSR makes your life quite a bit easier. You can author your package in TypeScript, and publish TypeScript source directly to JSR without a build step.
To see how this works (and see how much work JSR does for you behind the scenes)
let’s create and publish a TypeScript
module called yassify which will glow up a string of text with some emoji
💅✨👸. We’ll then use the TypeScript interface to this module in an
Astro project, which we’ll run
using Node.
Since Deno supports TypeScript natively, it will be fastest to build this module using Deno. However, you can author TypeScript using any runtime you wish.
Building the yassify package
In a terminal, create a new folder called yassify and create three files
inside it:
jsr.json- a metadata file for your packagemod.ts- the implementation of our module (this file could be called anything)README.md- a markdown file which will be used as the overview for your module on jsr.io
Inside jsr.json, include the following metadata about your package:
{
  "name": "@kwhinnery/yassify",
  "version": "1.0.0",
  "exports": "./mod.ts"
}
This metadata includes:
- The
nameattribute, which combines the scope and package name for your package - The
versionof your package - JSR packages are installed and deduplicated using semantic versioning - The
exportsfield, which specifies which modules of your package are usable by consumers.
Inside README.md, include some high-level usage instructions and examples for
your package. For now, it should be sufficient to use the following:
# yassify

Use `yassify` to apply advanced beauty filters to any string of text.

## License

MIT
Inside mod.ts, include an implementation of the yassify function:
/**
* Yassify a string of text by appending emoji
*
* @param str The string of text to yassify.
* @returns a string of text with emoji appended
*/
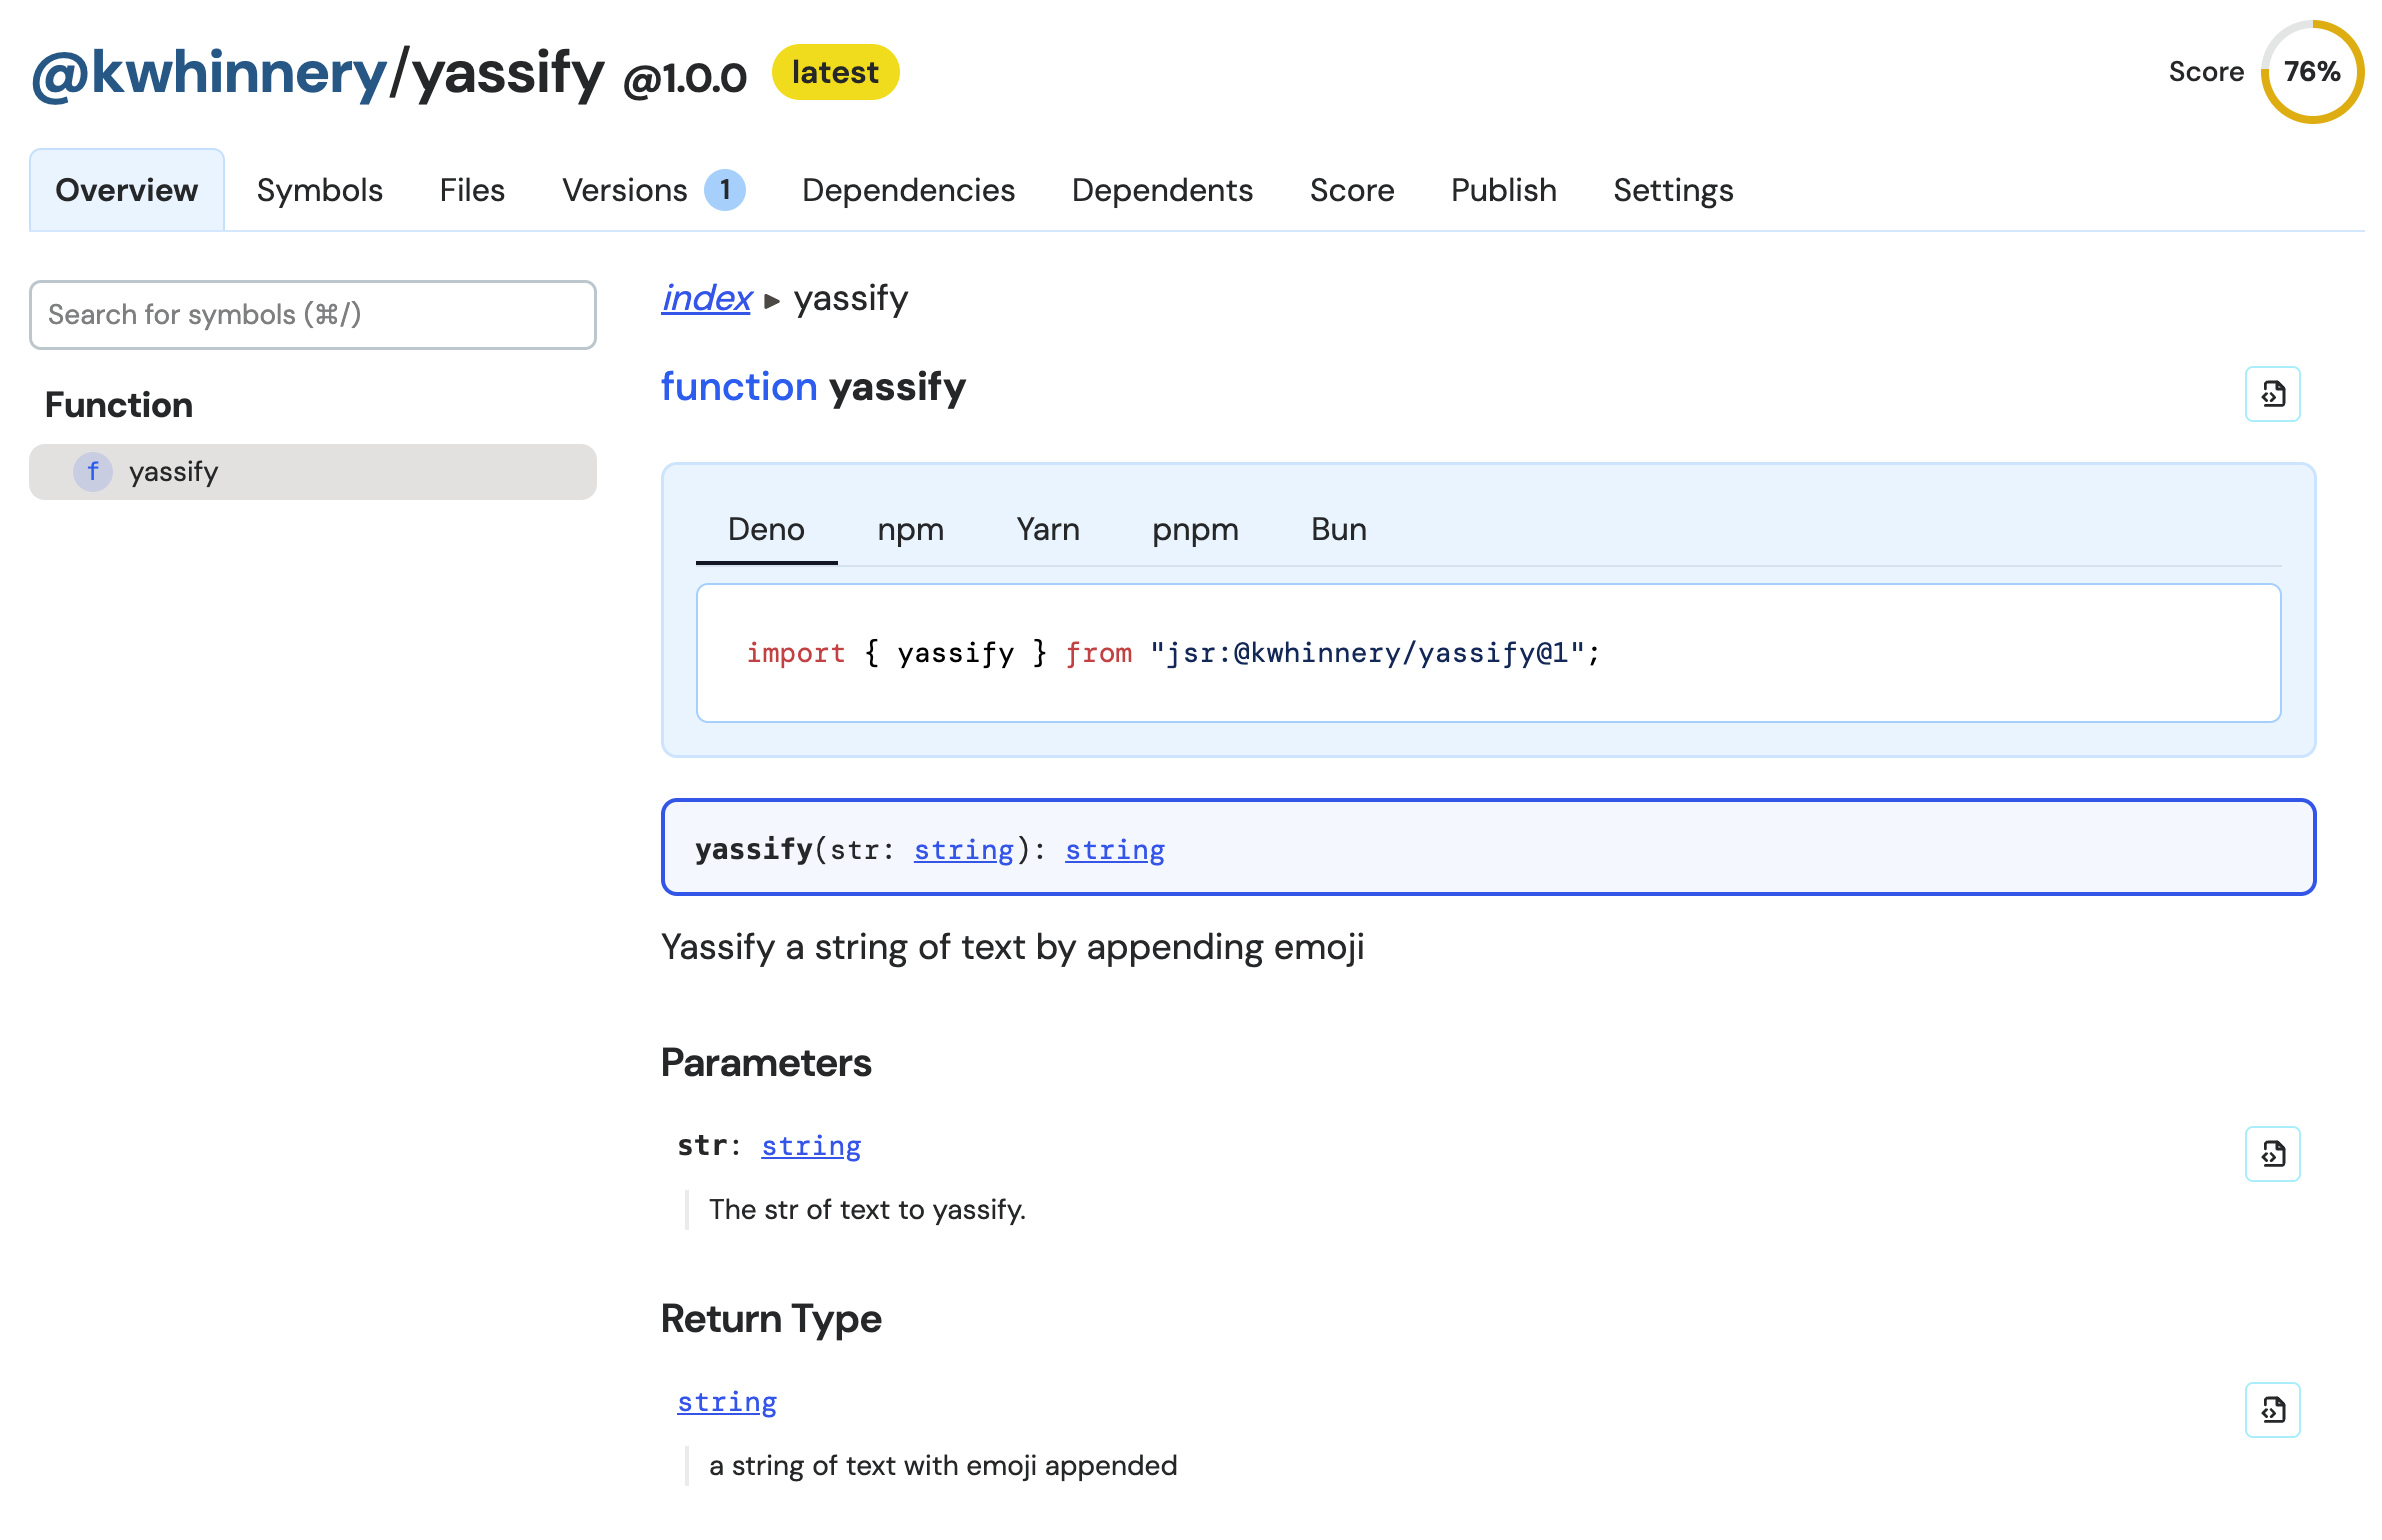
export function yassify(str: string): string {
return `${str} 💅✨👑`;
}With your three files created, you can publish your module from the command line
with the following command (or npx jsr publish if you are using a Node-based
environment):
deno publishIf this is the first time you are publishing this module, you’ll likely be prompted to create a scope and package name for it.
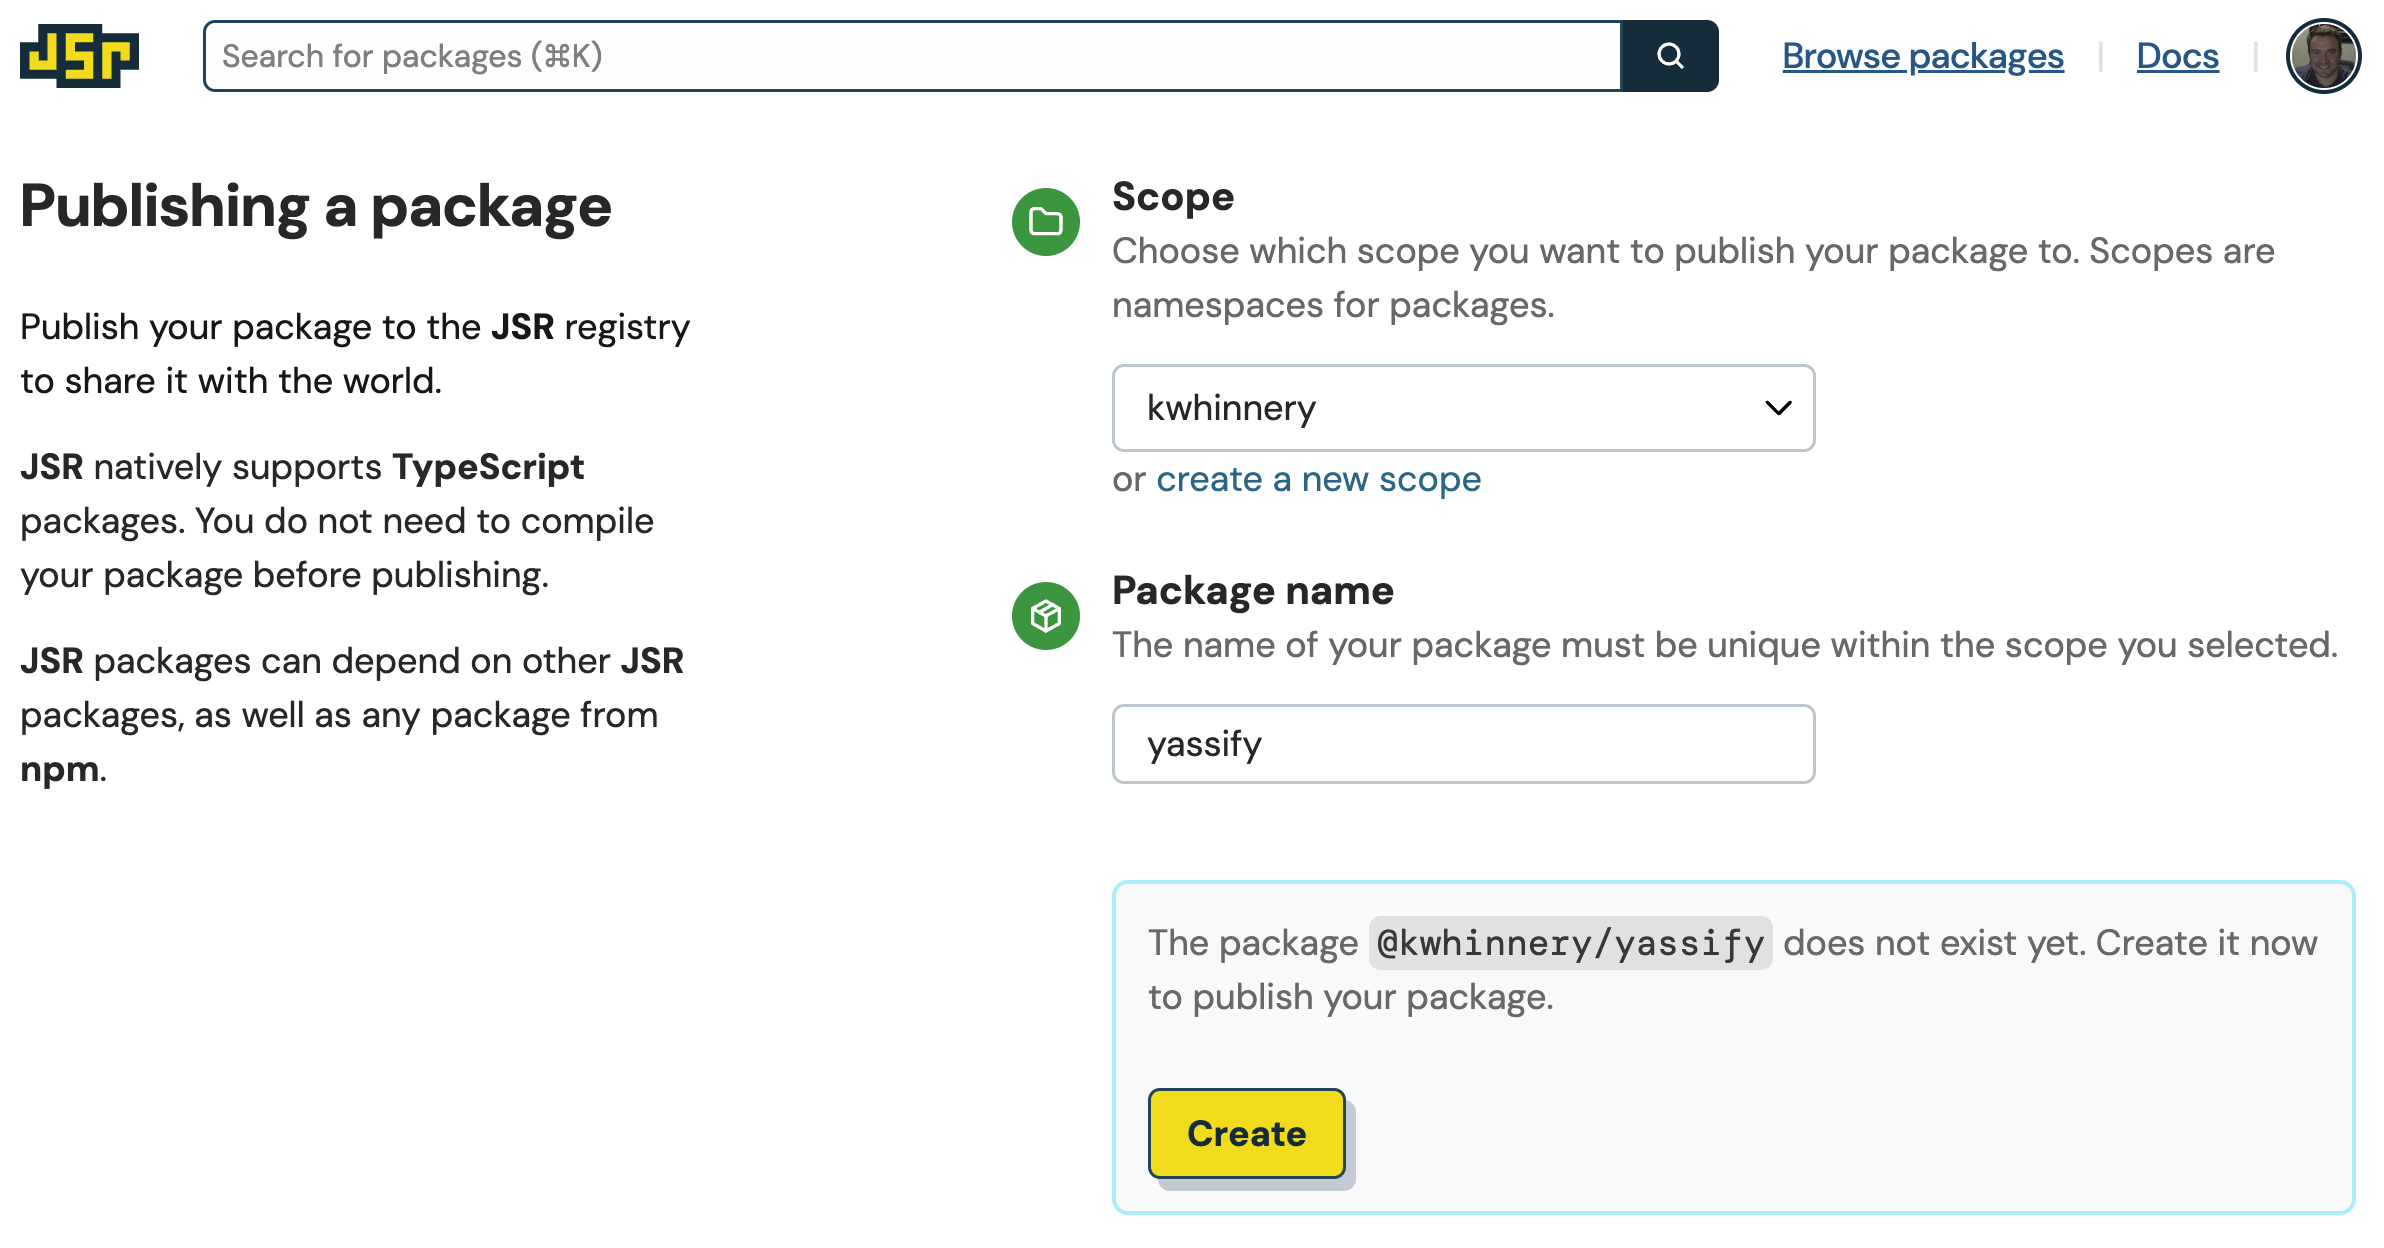
Clicking the “Create” button will prompt a final authorization check:
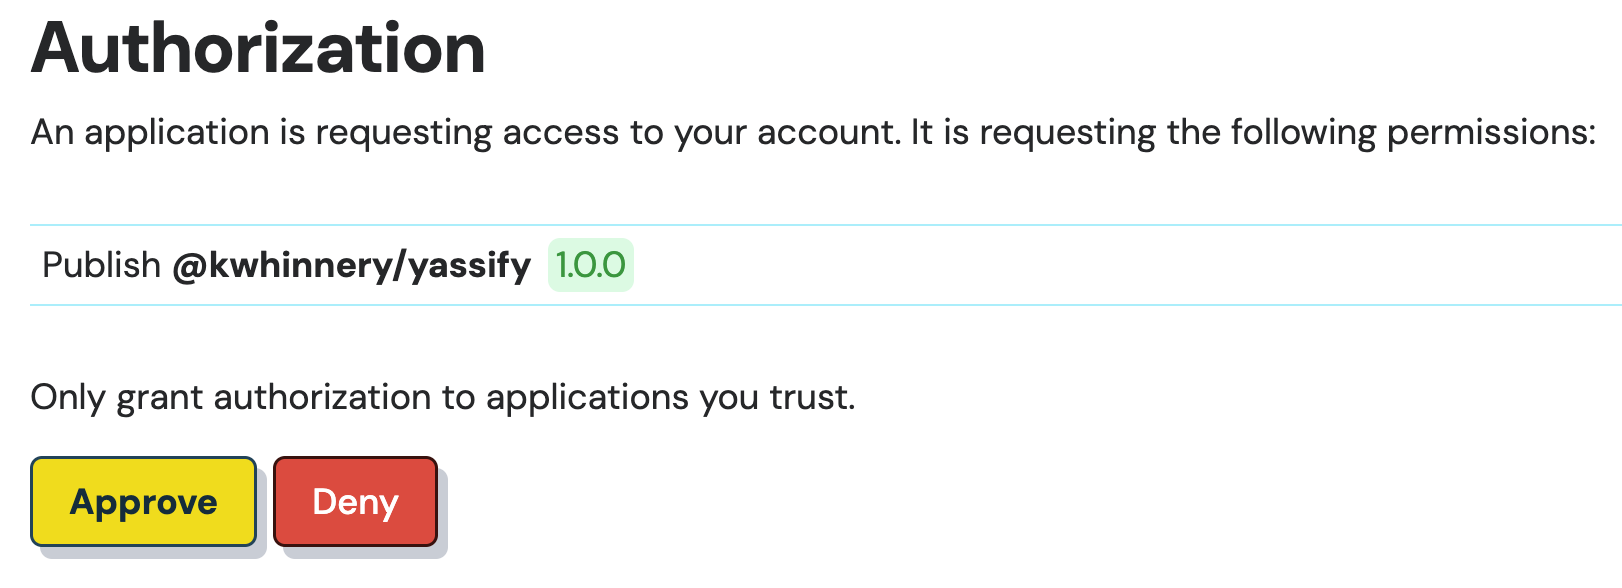
In a few moments, your package should be published to JSR!
kevin@kevin-deno yassify % deno publish
Check file:///Users/kevin/dev/kwhinnery/yassify/mod.ts
Checking for slow types in the public API...
Check file:///Users/kevin/dev/kwhinnery/yassify/mod.ts
'@kwhinnery/yassify' doesn't exist yet. Visit xxx to create the package
Waiting...
Package @kwhinnery/yassify created
Visit https://jsr.io/auth?code=x to authorize publishing of @kwhinnery/yassify
Waiting...
Authorization successful. Authenticated as Kevin Whinnery
Publishing @kwhinnery/yassify@1.0.0 ...
Successfully published @kwhinnery/yassify@1.0.0
Visit https://jsr.io/@kwhinnery/yassify@1.0.0 for details
If you visit your package page, as shown in the final line of your CLI output, you’ll notice that the README file you created is acting as the home page for your package. You’ll also notice the TypeScript API documentation has been automatically generated for your package.
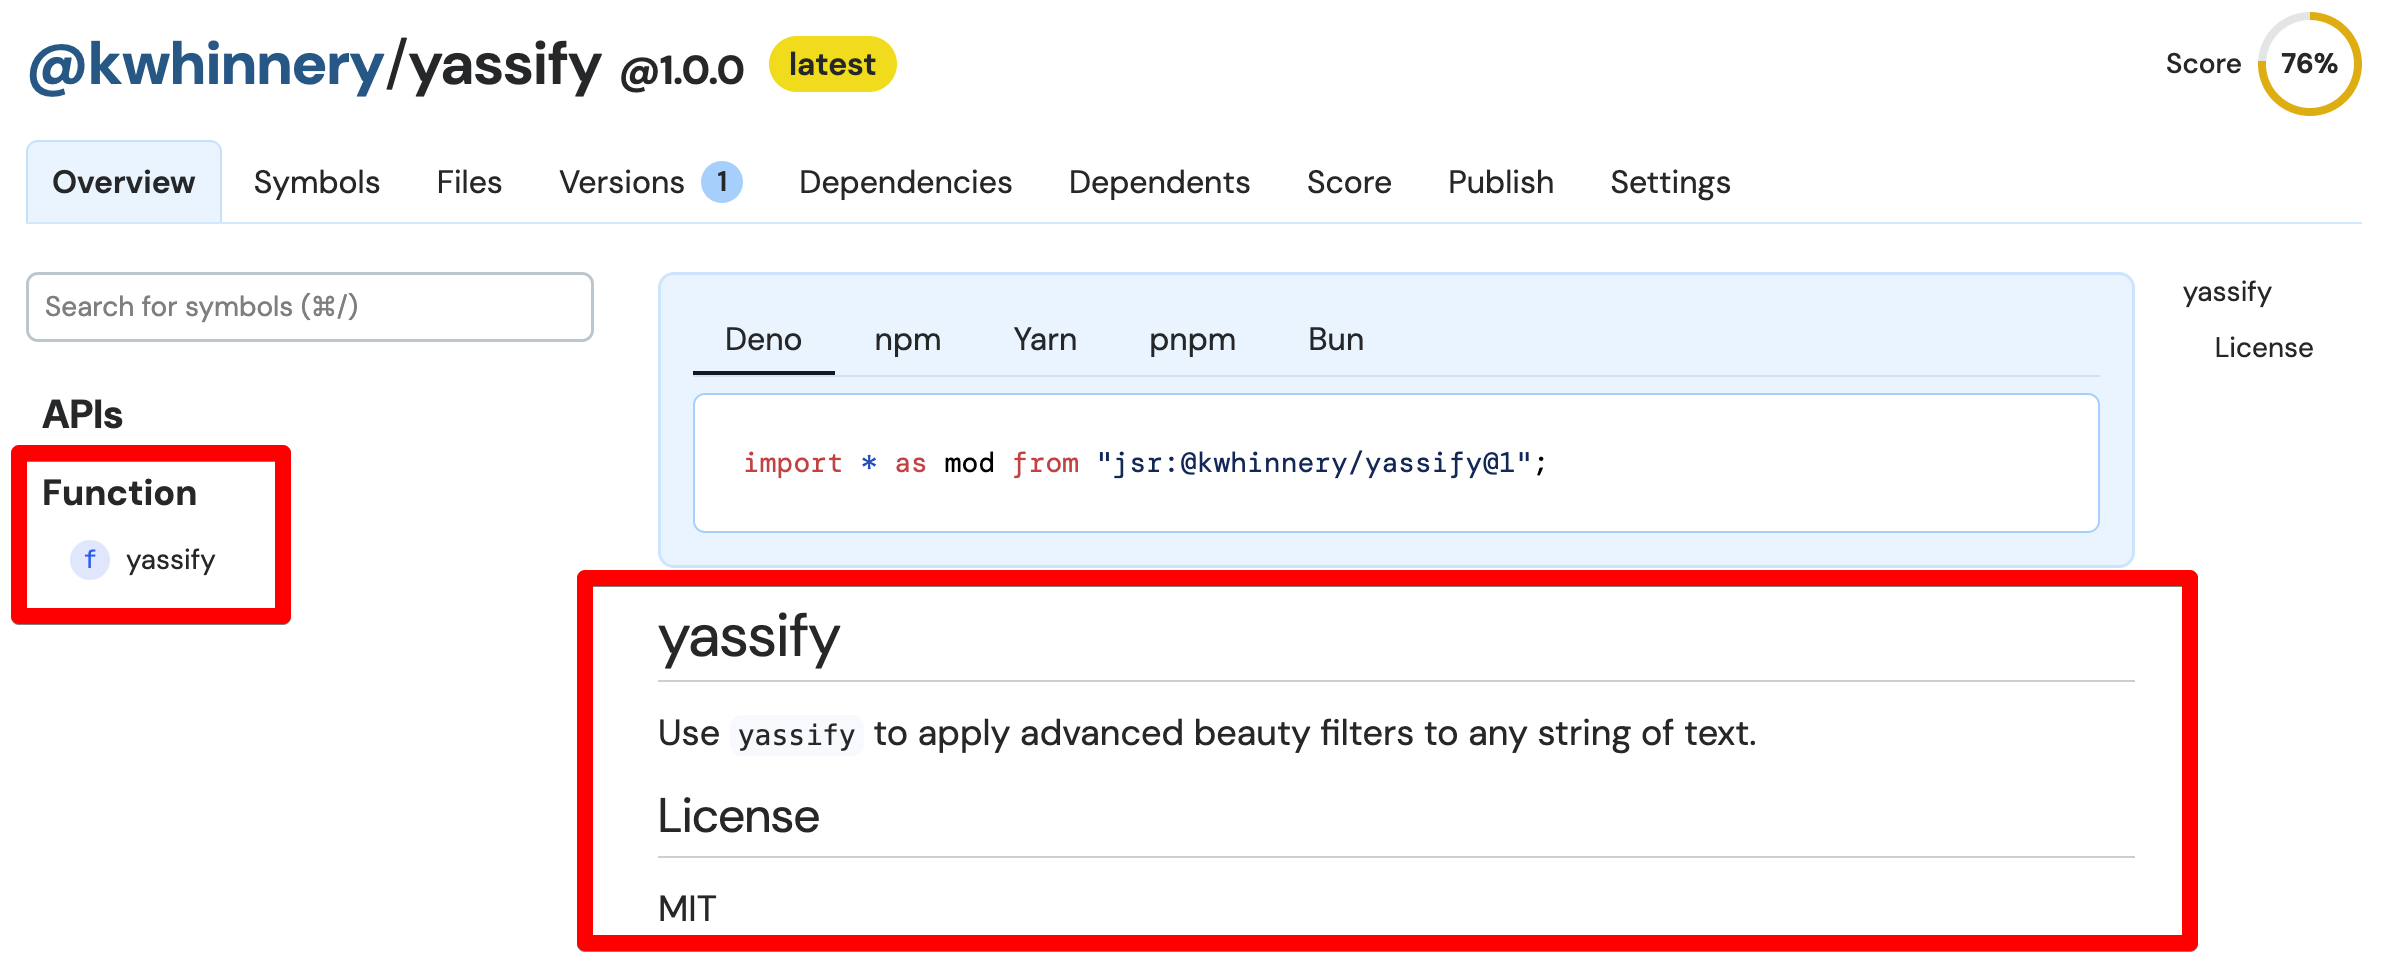
yassify package
For functions and symbols exported by your package, docs are generated from your source code and comments:
You can also help potential users understand which runtimes support your module
under the Settings tab. You might also want to configure a description of your
module here, which will appear in search results.
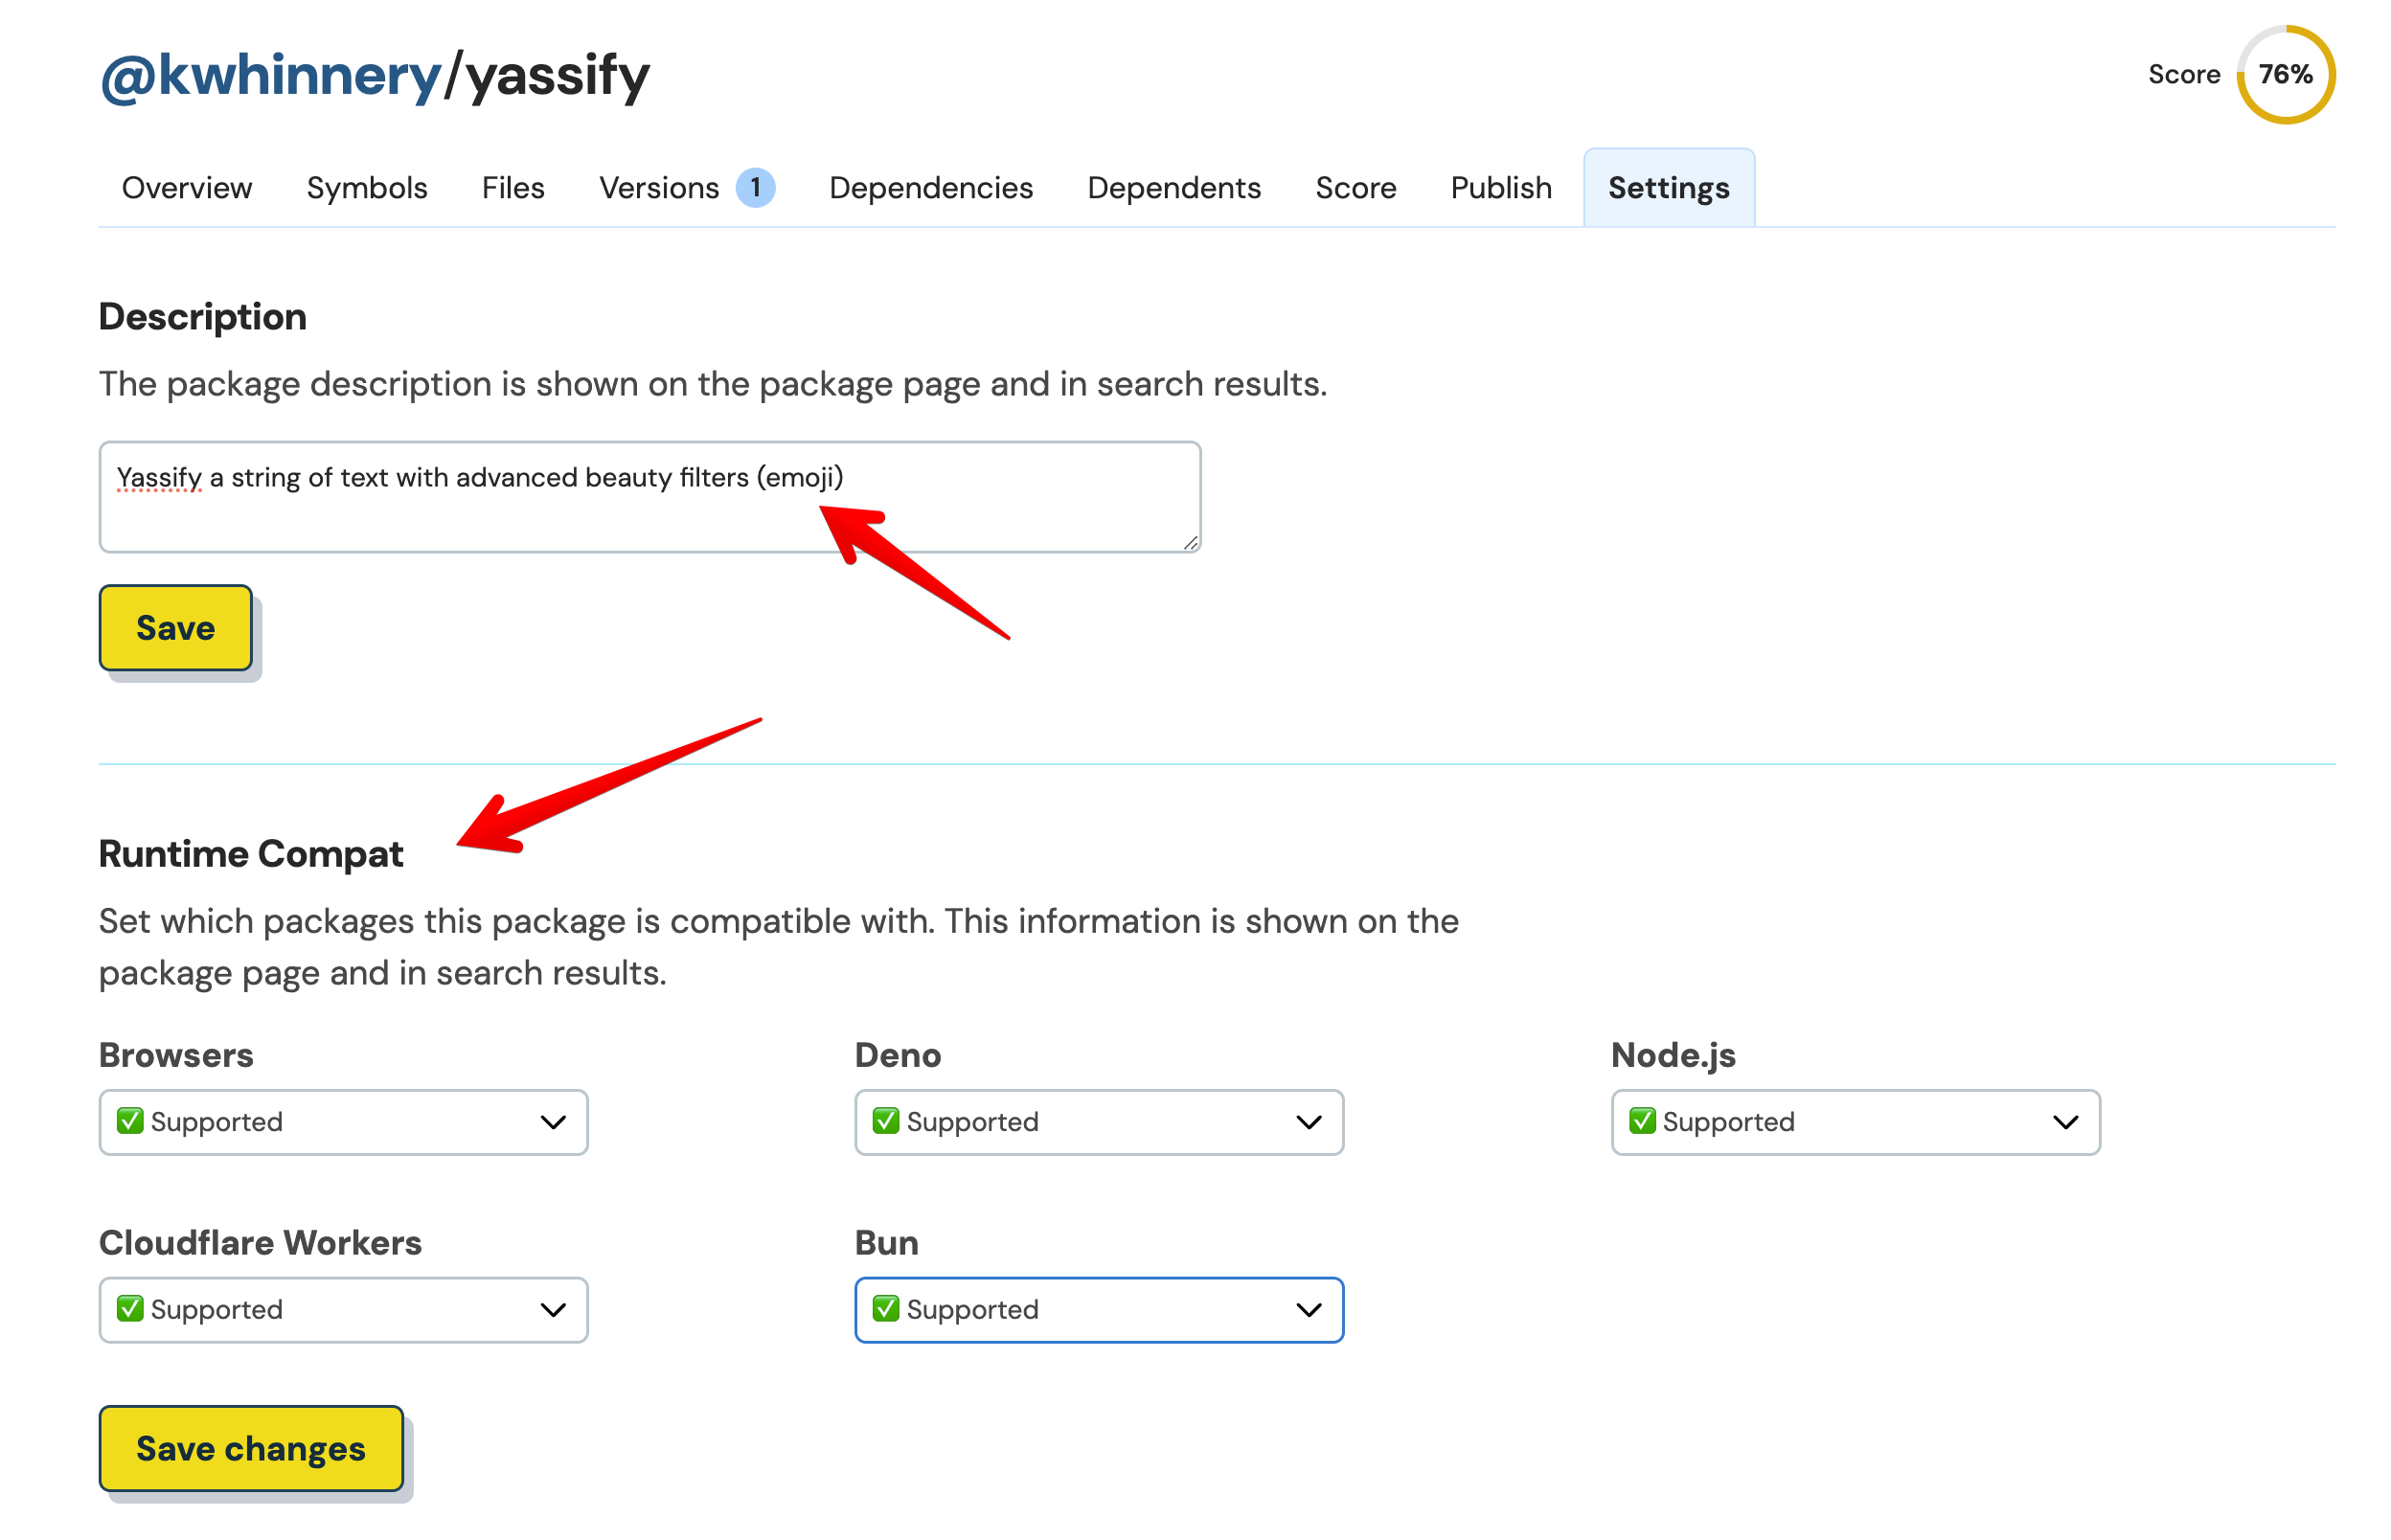
Taking the time to make these updates will also improve the overall quality
score of your package. yassify might not do much, but it is well documented!

yassify package with supported runtimes and a description
That should be all we need to do for now as a package publisher - let’s see what the experience is like using our package as a consumer.
Consuming your new module in an Astro project
Now it’s time to yassify a web app built using Astro. To create an Astro project that uses Node, execute the following command:
npm create astro@latestAccept all the default options, including the option to develop with TypeScript. You can also allow Astro to install all its npm dependencies.
Once your Astro project is created, you can install the yassify module you
just created using the following command (replace your own scope name as
needed):
npx jsr add @kwhinnery/yassifyWith our package installed, open up your Astro project in your favorite editor. If you use Visual Studio Code, you’ll get a few nice features which I’ll point out as we go.
In the default Astro example code, open up src/components/Card.astro. Astro
components can use TypeScript code within the
component script section
of the file. At the top of the file, add an import for yassify like so:
import { yassify } from "@kwhinnery/yassify";If you’re using VS Code, hover over the yassify import - notice that inline
docs are already available in the editor!
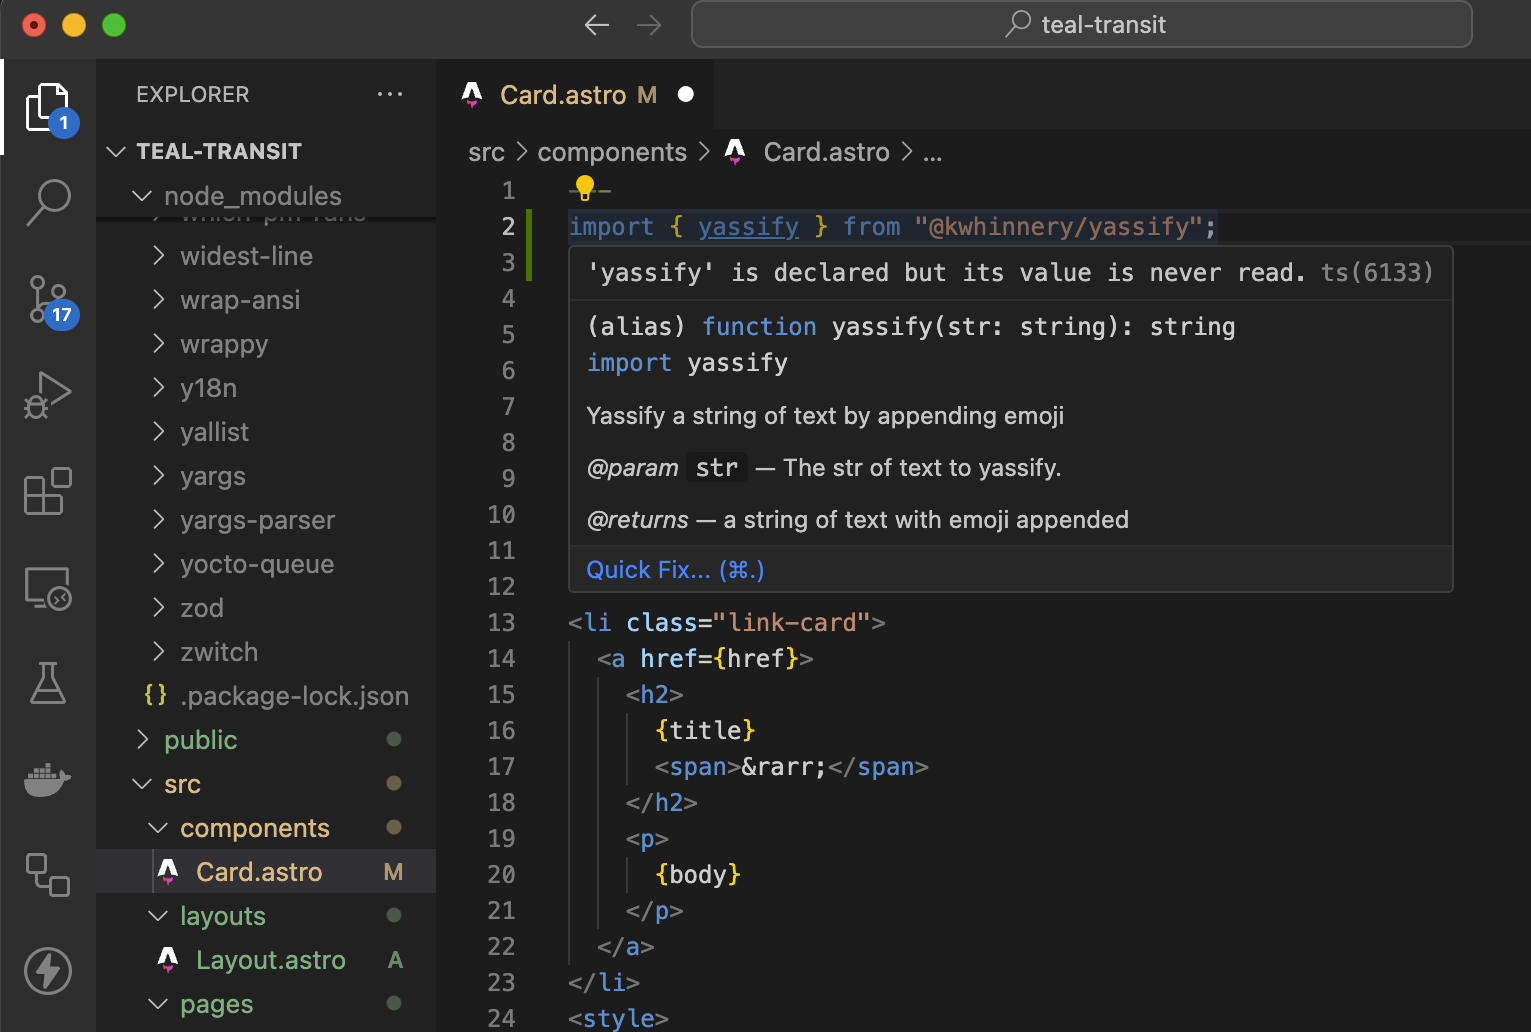
That’s because JSR has automatically transpiled the TypeScript code in your
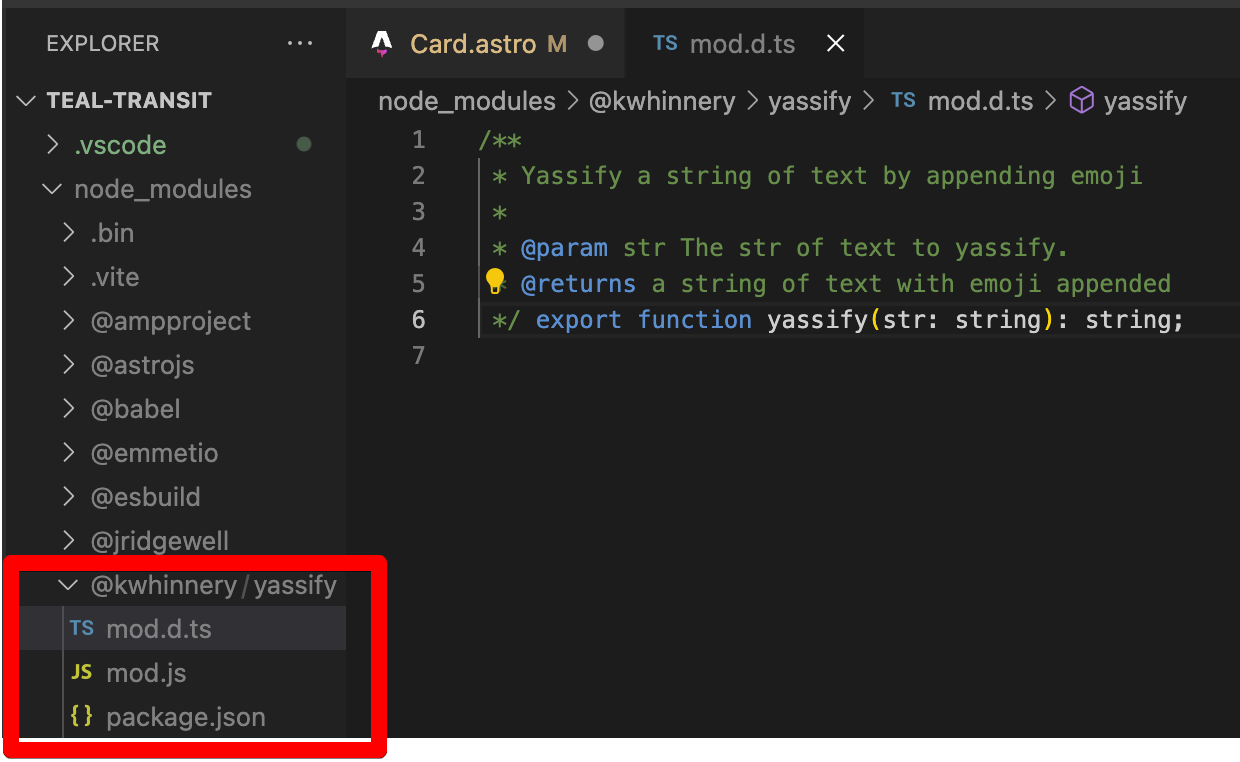
module, and included .d.ts files which give your editor hints about how your
module works. Command-click on the yassify function, and you’ll see the
.d.ts file inside your Astro project’s node_modules folder:
Finally, you can actually use the yassify function within your Astro project!
Inside the Card.astro file, yassify the title property of the component as
shown:
<li class="link-card">
<a href={href}>
<h2>
{yassify(title)}
<span>→</span>
</h2>
<p>
{body}
</p>
</a>
</li>If you haven’t already, you should now start your local Astro dev server with:
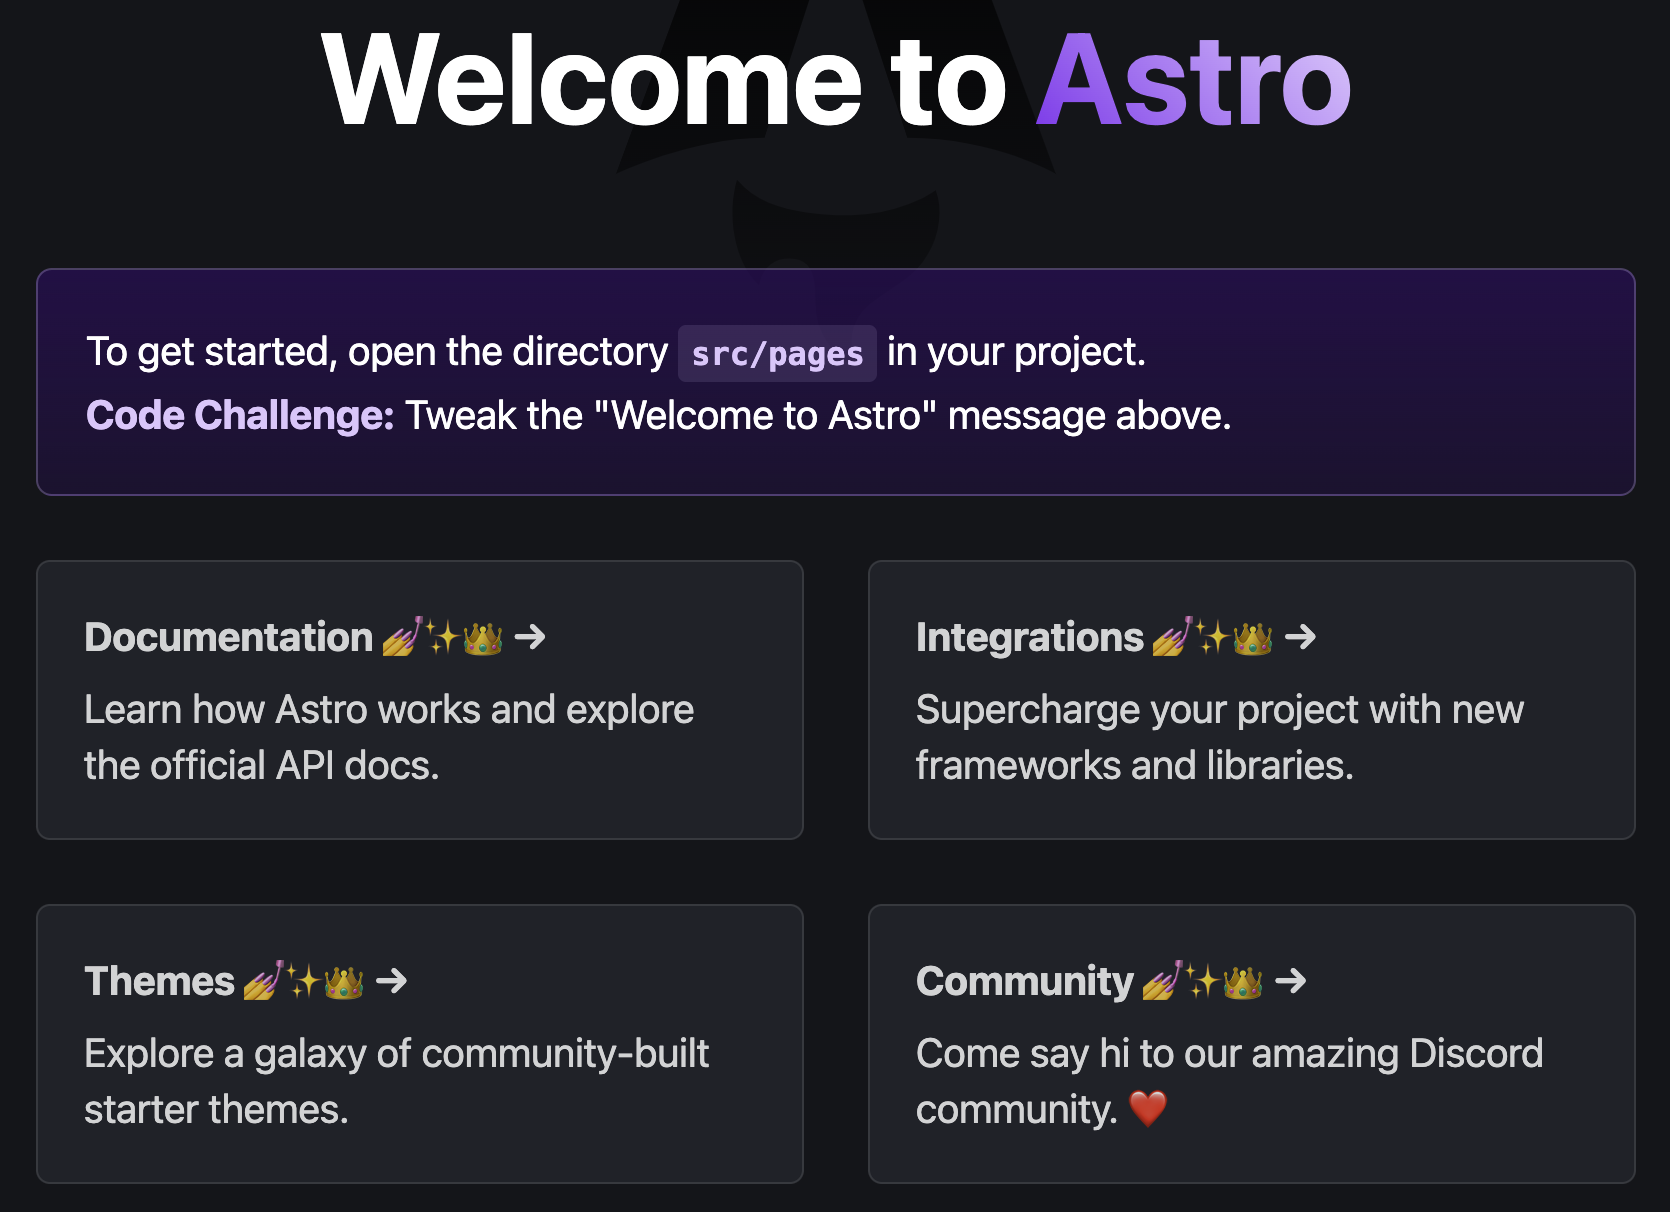
npm startVisiting http://localhost:4321 should reveal a new Astro placeholder page,
with all the Card titles appropriately transformed. Fabulous!
Publishing from GitHub
While publishing from the command line is all well and good for trying things
out, you’re probably going to want to
publish your package from CI.
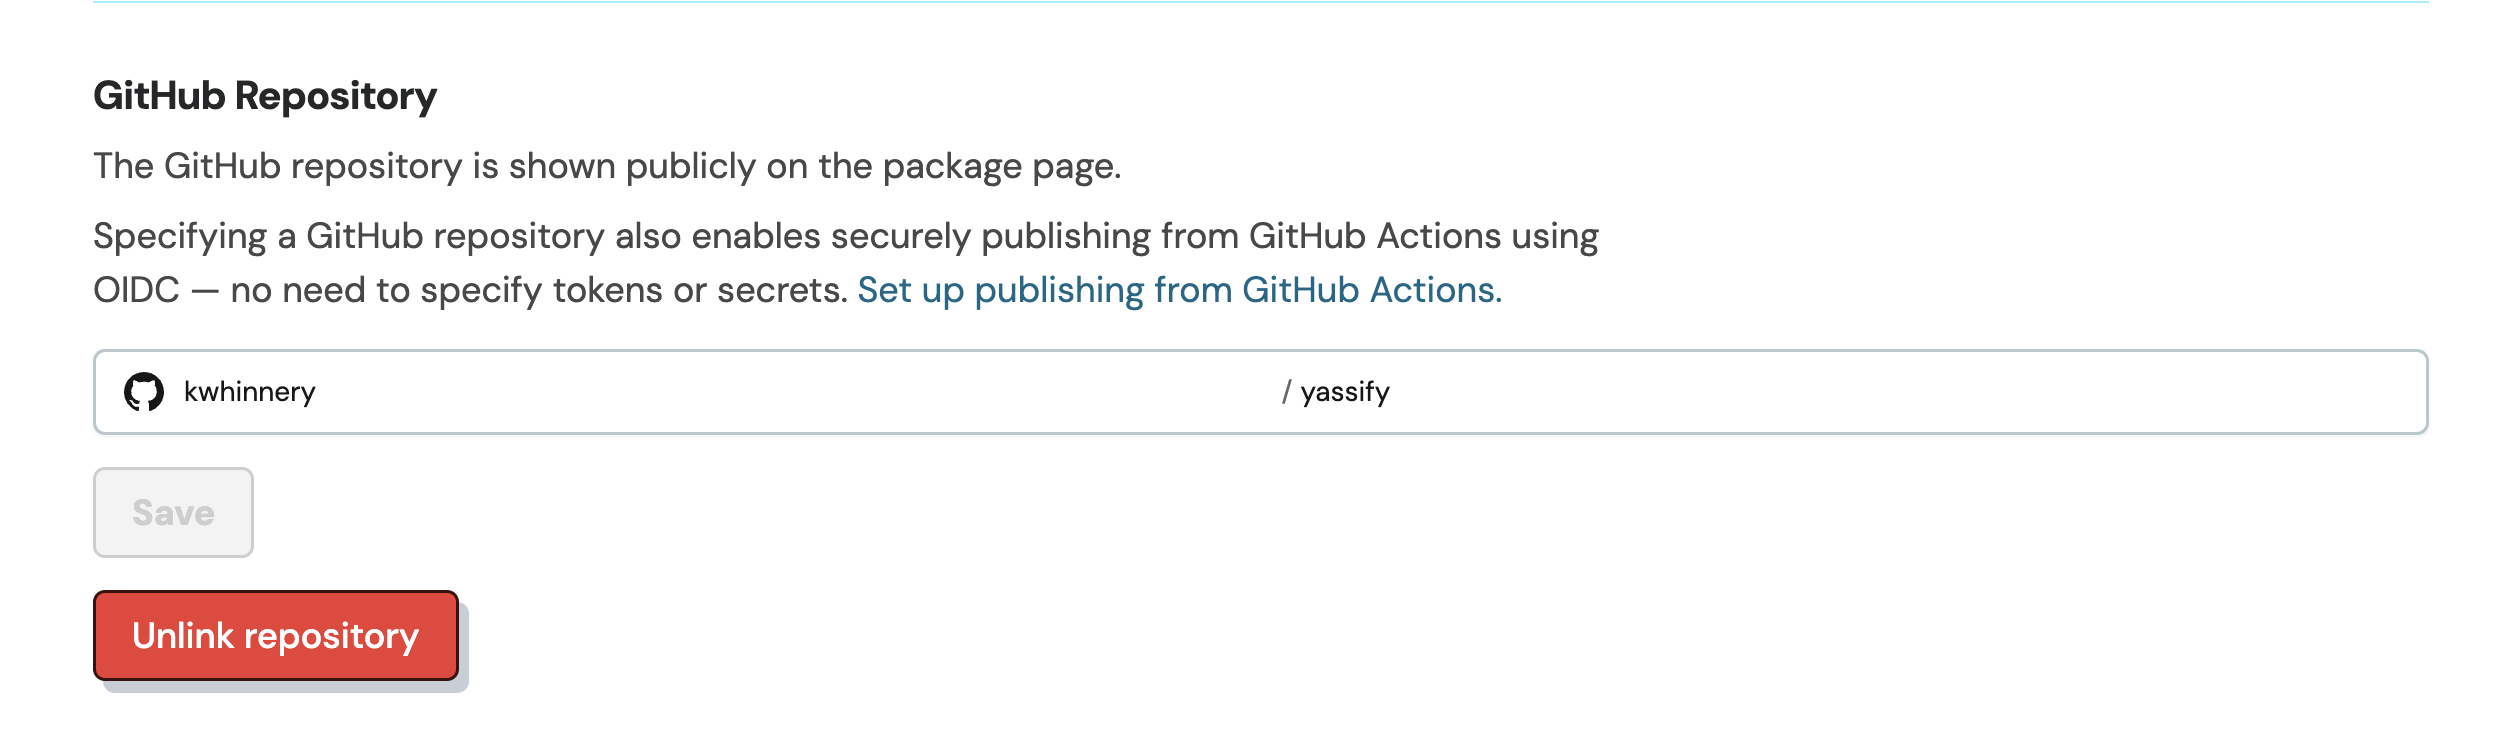
The easiest way to set that up on JSR is linking a GitHub repository. In the JSR
package Settings UI, configure a GitHub username and repository name where
your package source code is stored.
Learn how to set up a GitHub repo here
if you’re new to git and GitHub.
After linking your repository, add the following configuration to a file under
.github/workflows/publish.yml:
name: Publish

on:
  push:
    branches:
      - main

jobs:
  publish:
    runs-on: ubuntu-latest
    permissions:
      contents: read
      id-token: write # The OIDC ID token is used for authentication with JSR.
    steps:
      - uses: actions/checkout@v4
      - run: npx jsr publish
After pushing this file to your GitHub repository, further commits to the main
branch (when they contain a new version) will be automatically published to JSR.
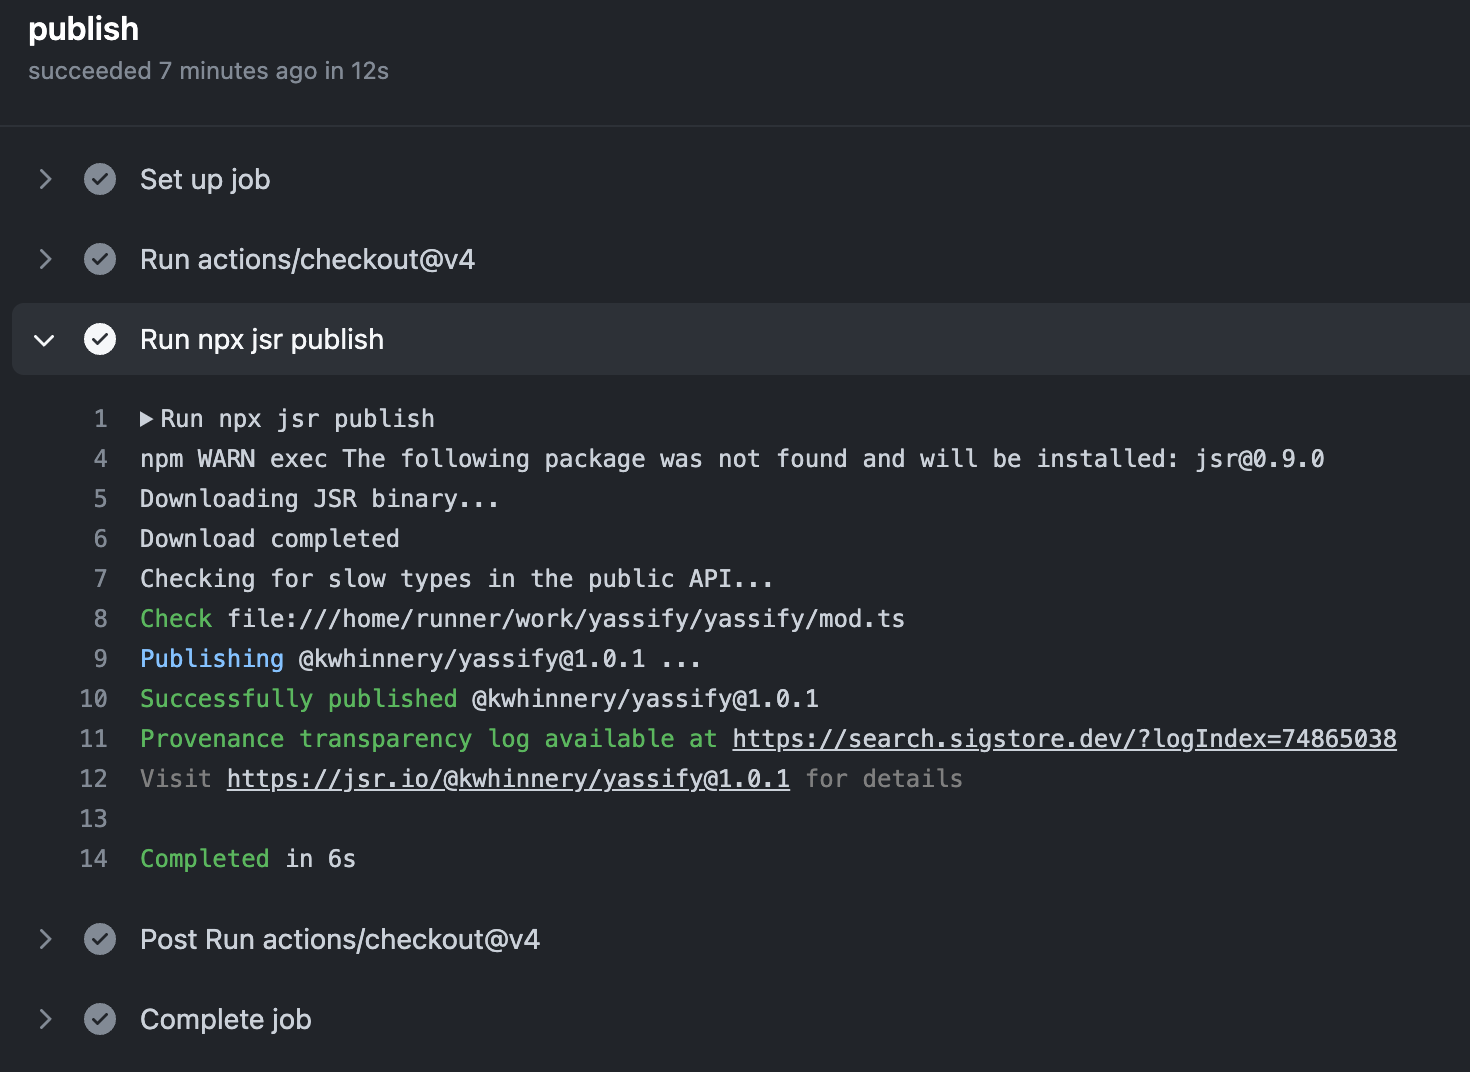
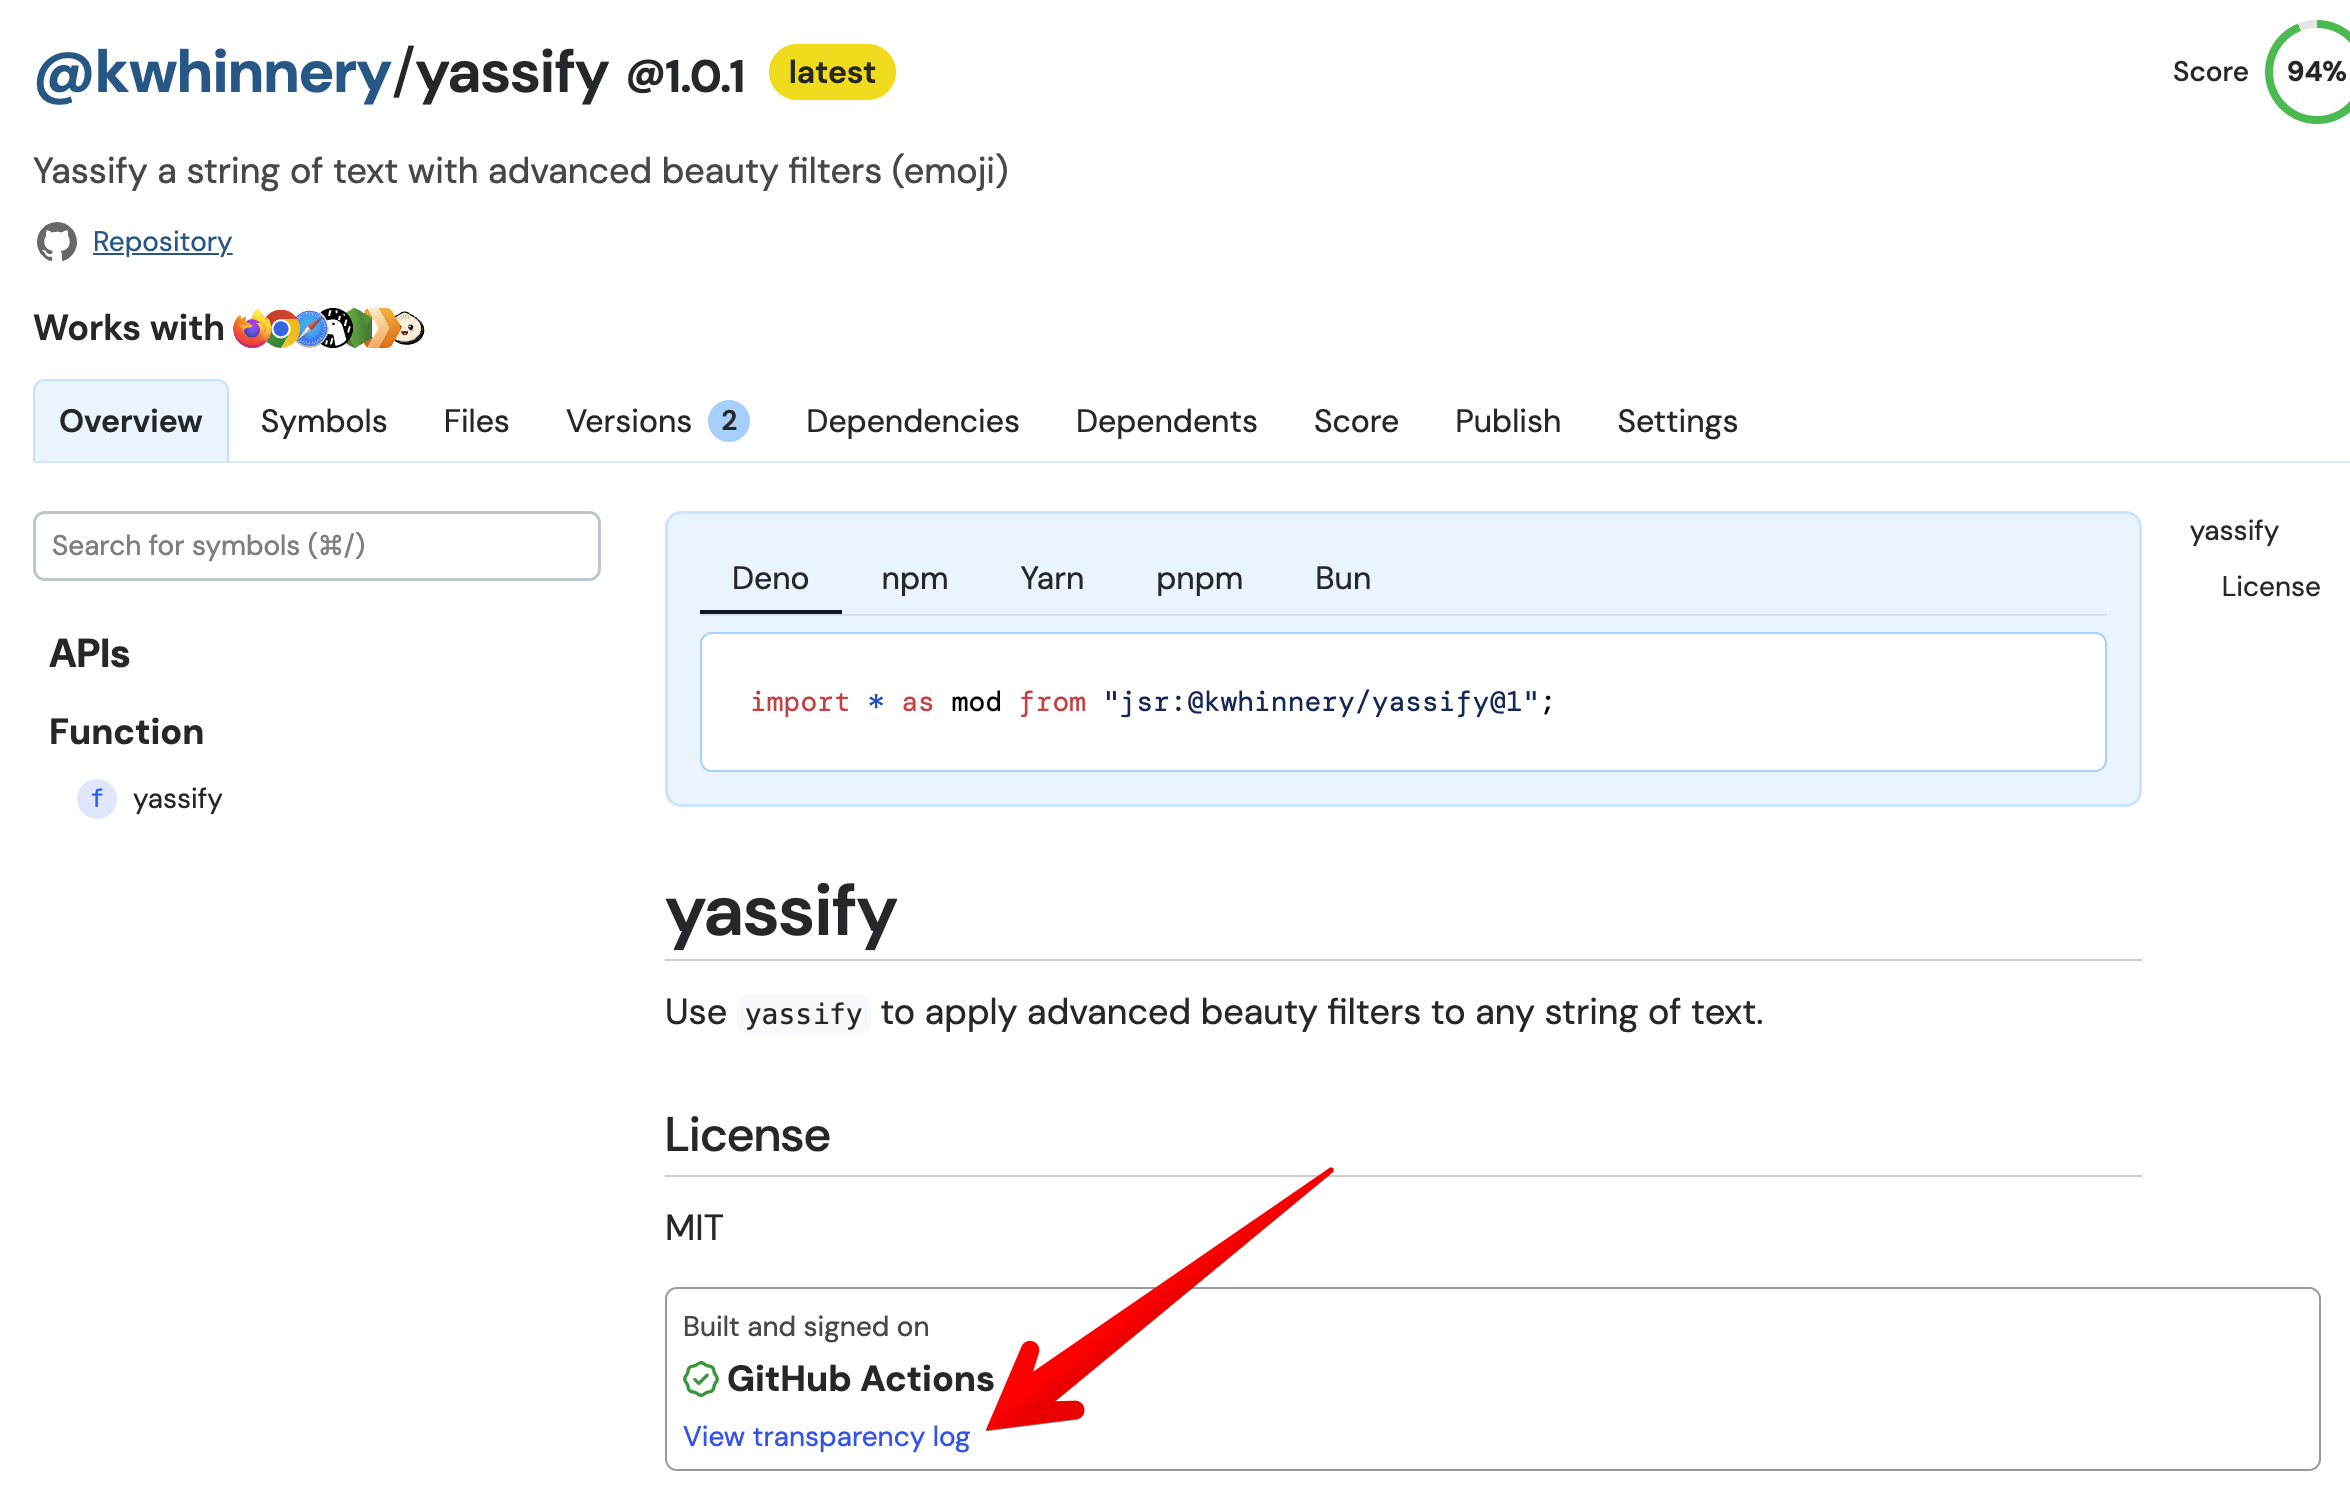
Publishing this way also gives your users peace of mind that the artifact they’re including in their project was indeed uploaded from CI, with a provenance transparency log available for viewing.
Help us level up the JavaScript ecosystem
While the Deno team has put a lot of work into JSR, we want JSR to be a public utility for the benefit of the entire JavaScript ecosystem. That’s why we’re making JSR free and open source under an MIT license. We have designed JSR to be cheap and relatively easy to host for anyone who decides to do so.
We also want to maintain JSR as a community space. We are still working out the particulars of how to govern the project, but as a first step, we’d like to invite community moderators to assist the Deno team in assigning protected scopes, handling disputes, and generally directing the day-to-day traffic on JSR. If you’re interested in becoming a JSR community moderator, please let us know here.
We also need your feedback - while we believe JSR to be very stable software, there’s a lot left to do, and we expect to learn a lot from the community in the coming weeks and months.
- If you discover a problem with JSR, please report it as a GitHub issue
- If you have feedback on JSR or would like help from the community, please join
us in the
#jsrand#jsr-feedbackchannels on Discord.
And finally, please follow @jsr_io on X/Twitter for news and updates from the JSR team.
JavaScript and the web platform are likely to remain the dominant programming environment for years to come. We hope that JSR will fuel the next 15 years of innovation by the JavaScript community, and help TypeScript and JavaScript developers be more productive no matter where their code runs.